13+ Spooktacular Halloween Finger Foods to Delight Your Guests
Halloween finger foods are all about fun, creativity, and a hint of spookiness! They’re easy to make and perfect for parties, combining festive flavors with playful presentations. From creepy-crawly treats to savory bites that look delightfully ghoulish, these snacks are sure to delight guests of all ages. Get ready to serve up some eerie eats that will make your Halloween gathering a hit!
Mozzarella Eyeballs
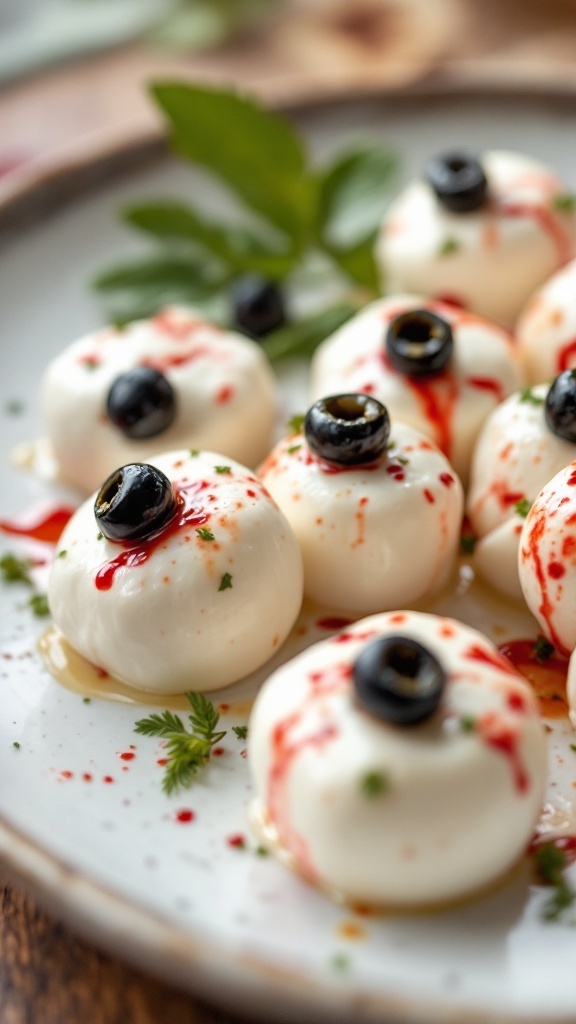
These Mozzarella Eyeballs are a fun and spooky addition to any Halloween gathering. With their creamy mozzarella base and a touch of olive tapenade for the ‘pupil,’ they are as delicious as they are festive. Plus, they are simple to make, allowing you to spend more time enjoying the party and less time in the kitchen!
The combination of flavors is light and fresh, perfect for balancing out the heavier snacks often found at Halloween parties. Your guests will love the playful presentation, making these eyeballs a conversation starter!
Ingredients
- 1 cup fresh mozzarella balls
- 1/2 cup black olives, pitted and sliced
- 1 tablespoon olive oil
- 1 tablespoon balsamic vinegar
- Fresh herbs (like basil or parsley), chopped
- Red food coloring or tomato sauce for ‘blood’
Instructions
- Prepare the Mozzarella: Drain the mozzarella balls and pat them dry with a paper towel.
- Create the Eyeballs: Place a sliced black olive on top of each mozzarella ball to create the eye’s pupil.
- Season: Drizzle olive oil and balsamic vinegar over the mozzarella and sprinkle with fresh herbs for added flavor.
- Add the ‘Blood’: Using a toothpick, apply a few drops of red food coloring or spoon a small amount of tomato sauce around the mozzarella to create a spooky effect.
- Serve: Arrange the Mozzarella Eyeballs on a platter and enjoy them chilled or at room temperature.
Pumpkin-Shaped Cheese Balls
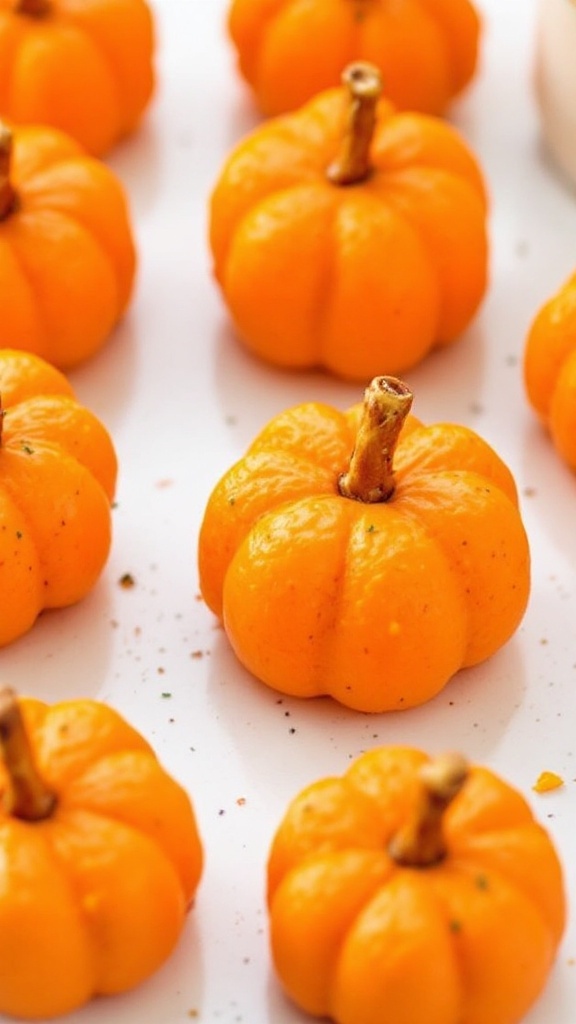
These pumpkin-shaped cheese balls are the perfect addition to your Halloween spread. They are creamy and flavorful, offering a delightful contrast with crunchy crackers or veggies. The best part? They are simple to whip up, making them a stress-free choice for your festive gathering.
With a bit of creativity and minimal ingredients, you can craft these cute snacks that will wow your guests. They are not only fun to look at but also delicious, bringing a light-hearted spirit to your Halloween celebrations.
Ingredients
- 8 oz cream cheese, softened
- 1 cup shredded cheddar cheese
- 1 teaspoon garlic powder
- 1 teaspoon onion powder
- 1/2 teaspoon paprika
- 1/4 teaspoon salt
- 1/4 teaspoon black pepper
- Orange food coloring
- Chopped parsley or chives for garnish
- Small pretzel sticks for stems
Instructions
- In a bowl, mix the softened cream cheese and shredded cheddar until well combined.
- Add garlic powder, onion powder, paprika, salt, and pepper, and mix until thoroughly blended.
- Stir in a few drops of orange food coloring until you achieve the desired pumpkin color.
- Using your hands, form the mixture into small pumpkin shapes.
- Insert a pretzel stick into the top of each cheese ball to create the stem.
- Chill in the refrigerator for about 30 minutes before serving, and garnish with chopped parsley or chives if desired.
Poison Apple Slices
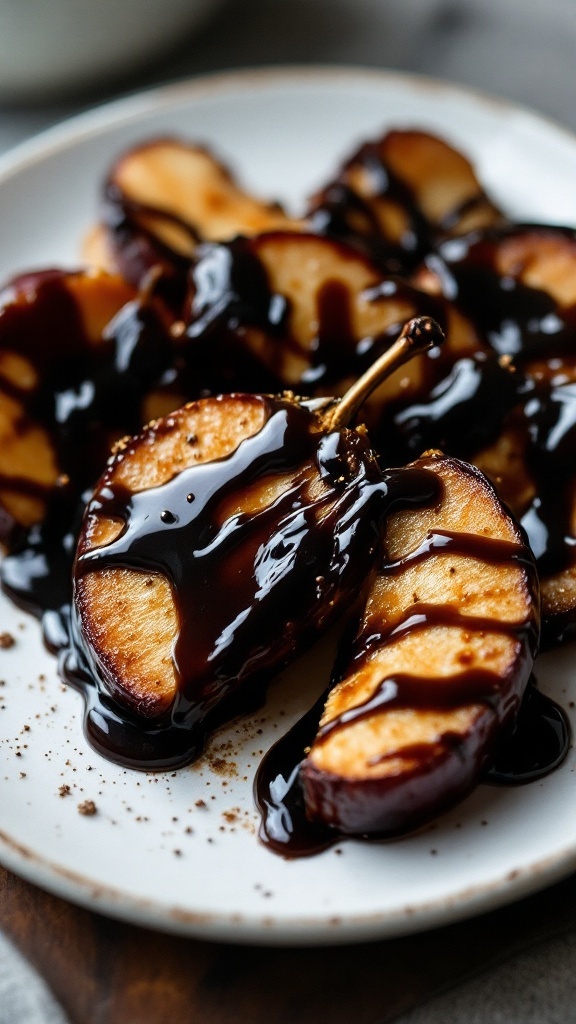
Poison Apple Slices are a fun and spooky treat that fits right into the Halloween spirit. These slices combine the crispness of fresh apples with a rich, dark chocolate drizzle, creating a tasty contrast that’s both sweet and slightly indulgent. They are easy to prepare, making them a perfect option for your Halloween gathering.
The combination of tart apple flavor and the smooth chocolate creates a delightful taste experience. Not only are they delicious, but they also add a unique and festive flair to your party table. Whether you’re serving them at a Halloween party or just craving a seasonal snack, these slices are sure to be a hit.
Ingredients
- 2 medium-sized apples (red or green)
- 1/2 cup dark chocolate chips
- 1 tablespoon coconut oil (optional)
- 1 teaspoon sea salt (for garnish)
Instructions
- Prepare the Apples: Wash and slice the apples into thin wedges, removing the seeds as you go.
- Melt the Chocolate: In a microwave-safe bowl, combine dark chocolate chips and coconut oil (if using). Microwave in 30-second intervals, stirring in between, until fully melted and smooth.
- Coat the Apple Slices: Dip each apple slice into the melted chocolate or drizzle the chocolate over the slices using a spoon.
- Add Salt: Sprinkle a pinch of sea salt on top for an added flavor boost.
- Chill: Place the chocolate-coated apple slices on a parchment-lined tray and refrigerate for about 15-20 minutes until the chocolate hardens.
- Serve: Arrange the slices on a platter and enjoy your spooky snack!
Bat-Wing Wontons
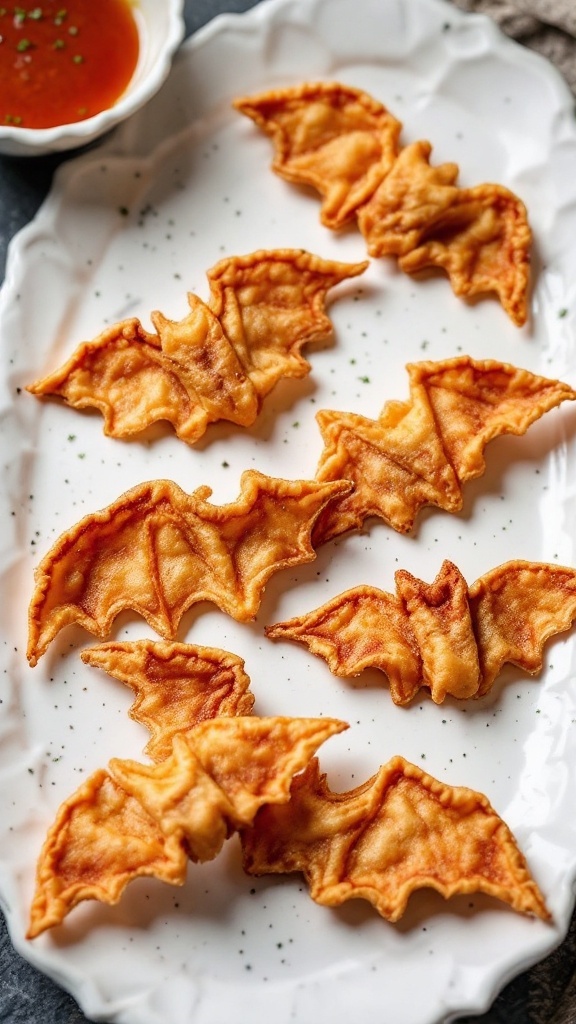
These Bat-Wing Wontons are a fun and festive addition to your Halloween gathering. With their crispy texture and savory filling, they’re sure to please both kids and adults alike. Plus, they’re surprisingly easy to whip up, making them an ideal choice for a busy holiday!
Perfect for dipping in your favorite sauce, these wontons not only look spooky but are also packed with flavor. Whether you’re throwing a party or just looking for a snack, these bat-shaped treats will add a playful touch to your Halloween spread.
Ingredients
- 1 package of wonton wrappers
- 1 cup cooked chicken (shredded)
- 1/2 cup cream cheese (softened)
- 1/4 cup green onions (chopped)
- 1 teaspoon garlic powder
- Salt and pepper to taste
- Oil for frying
- Sweet chili sauce for dipping
Instructions
- Prepare the Filling: In a bowl, mix together the shredded chicken, cream cheese, green onions, garlic powder, salt, and pepper until well combined.
- Shape the Wontons: Take a wonton wrapper and place a small spoonful of the filling in the center. Moisten the edges with water, fold the wrapper, and pinch the edges to seal. Use a sharp knife to trim the edges into a bat wing shape.
- Heat the Oil: In a deep skillet, heat enough oil for frying over medium heat.
- Fry the Wontons: Once the oil is hot, carefully add the bat-shaped wontons in batches. Fry them for about 2-3 minutes on each side or until they turn golden brown.
- Drain and Serve: Remove the wontons from the oil and place them on paper towels to absorb excess oil. Serve warm with sweet chili sauce for dipping.
Spider Egg Truffles
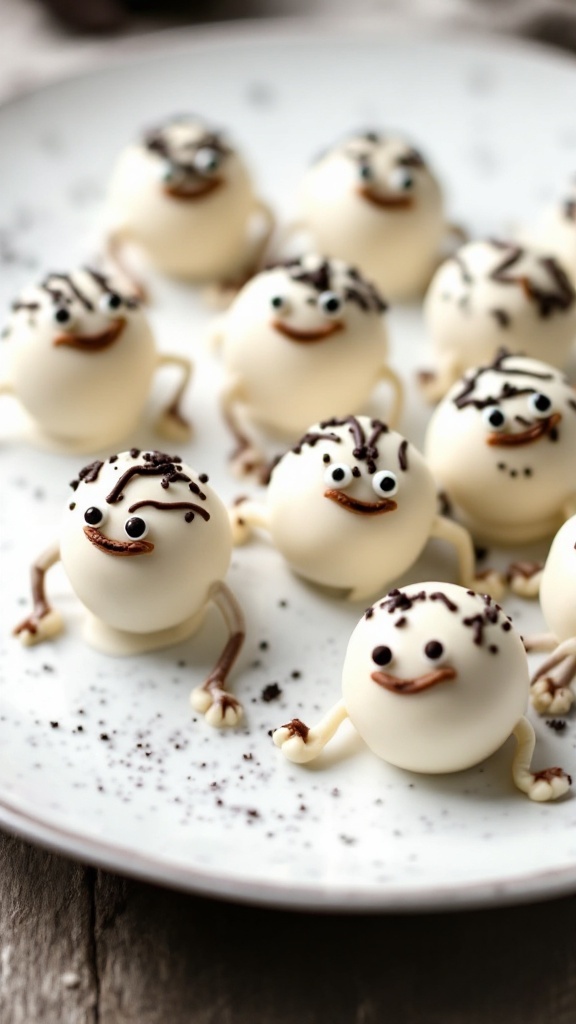
Spider Egg Truffles are a fun and playful addition to any Halloween celebration. These little delights are made of creamy chocolate and covered in a sweet white coating, making them both tasty and visually appealing. With their cute spider accents, they’ll definitely bring that festive spooky vibe to your table.
Not only are these truffles delicious, but they are also easy to prepare. Whether you’re hosting a party or just looking for a festive treat, these truffles will surely be a hit with kids and adults alike. Let’s dive into how to make these spooky snacks!
Ingredients
- 1 cup chocolate cookie crumbs
- 1/2 cup cream cheese, softened
- 1 cup white chocolate chips
- 1 tablespoon vegetable oil
- Chocolate sprinkles for decoration
- Mini chocolate candies for eyes
- Chocolate drizzle for spider legs
Instructions
- Combine the Cookie Crumbs: In a mixing bowl, blend the chocolate cookie crumbs and softened cream cheese until well combined.
- Form the Truffles: Scoop out small portions of the mixture and roll them into balls, about 1 inch in diameter. Place them on a baking sheet lined with parchment paper.
- Chill the Balls: Refrigerate the truffles for at least 30 minutes to firm them up.
- Melt the White Chocolate: In a microwave-safe bowl, melt the white chocolate chips and vegetable oil, stirring until smooth.
- Coat the Truffles: Dip each chilled truffle into the melted white chocolate, allowing any excess to drip off. Return them to the parchment-lined baking sheet.
- Decorate: Before the coating sets, sprinkle the tops with chocolate sprinkles and add mini chocolate candies for eyes. Use chocolate drizzle to create spider legs.
- Let Set and Serve: Allow the truffles to set completely before serving. Enjoy your spooky Spider Egg Truffles!
Zombie Sliders

Zombie sliders are a spooky twist on the classic slider, perfect for a Halloween gathering. These mini burgers are bursting with flavor and can be customized with your favorite toppings, making them a hit at any party. Plus, they’re simple to prepare, so you won’t spend hours in the kitchen.
Each bite is juicy and satisfying, combining the savory taste of a beef patty with fresh veggies and tangy sauces. These sliders are not just delicious; they’re fun to look at and even more fun to eat, making them an entertaining addition to your Halloween finger foods.
Ingredients
- 1 pound ground beef
- 1 teaspoon garlic powder
- Salt and pepper to taste
- 12 slider buns
- 1 cup shredded lettuce
- 1/2 cup sliced pickles
- 1 cup ketchup
- 1/2 cup mustard
Instructions
- Preheat your grill or skillet over medium heat.
- In a bowl, mix the ground beef with garlic powder, salt, and pepper. Form into small patties.
- Cook the patties for about 3-4 minutes on each side until they reach your desired doneness.
- While the patties are cooking, prepare the slider buns by toasting them lightly.
- Assemble the sliders by placing a patty on each bun, then add lettuce, pickles, ketchup, and mustard.
- Secure each slider with a toothpick for easy serving. Enjoy your spooky treats!
Pumpkin Patch Hummus Cups
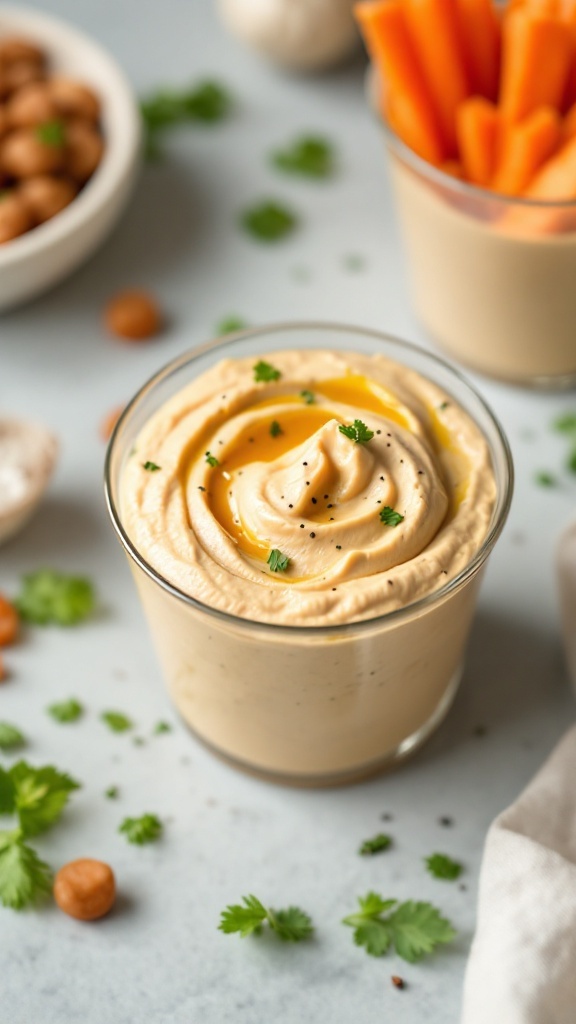
Get ready to impress your guests with these delightful Pumpkin Patch Hummus Cups! This fun and festive snack combines the creamy texture of hummus with a hint of pumpkin spice, making it a perfect addition to any Halloween gathering. The taste is rich and savory, with just the right amount of sweetness from the pumpkin, ensuring that everyone—from kids to adults—will enjoy it.
Making these cups is simple and quick, so you won’t spend hours in the kitchen. Layer the hummus with colorful veggies for a vibrant presentation that screams Halloween. These cups are not just tasty; they also add a healthy twist to your finger foods. Plus, they can be prepared in advance, making them a stress-free choice for your party!
Ingredients
- 1 can (15 oz) chickpeas, drained and rinsed
- 1/2 cup pumpkin puree
- 2 tablespoons tahini
- 2 tablespoons olive oil
- 2 tablespoons lemon juice
- 1 teaspoon garlic powder
- 1 teaspoon ground cumin
- 1 teaspoon pumpkin spice
- Salt and pepper to taste
- Carrot sticks, cucumber slices, and pita chips for serving
Instructions
- Blend the Hummus: In a food processor, combine the chickpeas, pumpkin puree, tahini, olive oil, lemon juice, garlic powder, cumin, pumpkin spice, salt, and pepper. Blend until smooth and creamy.
- Adjust Flavor: Taste the hummus and adjust seasoning if needed. You can add more pumpkin spice for extra flavor.
- Serve: Spoon the hummus into small cups or bowls. Arrange carrot sticks, cucumber slices, and pita chips around the cups for dipping.
- Chill: Refrigerate the cups for at least 30 minutes before serving to enhance the flavors.
Mummy Jalapeno Poppers

Mummy Jalapeno Poppers are a fun and festive finger food that’s perfect for Halloween gatherings. These little bites pack a flavorful punch, combining the heat of jalapenos with a creamy cheese filling, all wrapped up in a flaky pastry. They are easy to make and sure to be a hit with both kids and adults!
The combination of spicy jalapenos and rich cheese creates a delightful contrast, while the mummy-like appearance adds a playful twist. Whether you’re hosting a Halloween party or just looking for a spooky snack, these poppers offer a delicious and striking option that will impress your guests.
Ingredients
- 12 fresh jalapenos
- 8 oz cream cheese, softened
- 1 cup shredded cheddar cheese
- 1 teaspoon garlic powder
- 1 teaspoon onion powder
- 1 package crescent roll dough
- Black olives, sliced (for eyes)
Instructions
- Preheat your oven to 375°F (190°C) and line a baking sheet with parchment paper.
- Slice the jalapenos in half lengthwise and remove the seeds. This will reduce the heat slightly, but you can keep some seeds for extra spice.
- In a bowl, mix the cream cheese, cheddar cheese, garlic powder, and onion powder until well combined.
- Fill each jalapeno half with the cheese mixture, ensuring they are generously stuffed.
- Unroll the crescent roll dough and cut it into thin strips. Wrap the strips around each stuffed jalapeno, leaving a small gap for the “eyes.”
- Place the wrapped jalapenos on the prepared baking sheet. Press the sliced olives into the exposed cheese to create eyes.
- Bake for 20-25 minutes, or until the dough is golden brown and crispy.
- Let them cool slightly before serving, and enjoy your spooky snacks!
Spider Web Pizzas
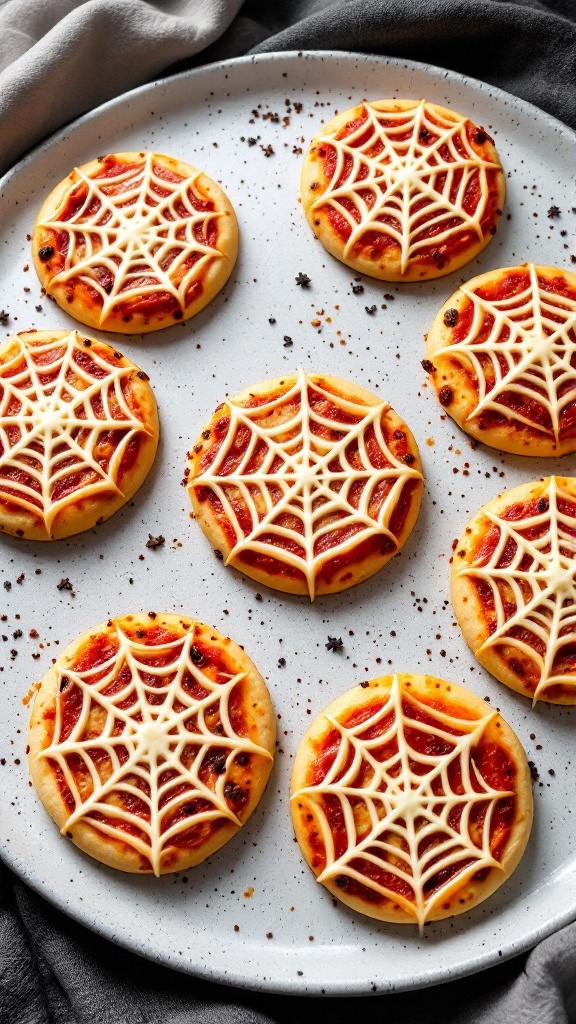
Spider Web Pizzas are a fun and festive finger food that perfectly captures the spirit of Halloween. These mini pizzas are not only delicious but also visually appealing with their whimsical spider web design. The combination of gooey cheese and zesty marinara sauce creates a delightful taste that everyone will enjoy. Plus, they’re super easy to make, making them a great choice for a Halloween gathering or party.
With just a few simple ingredients, you can whip up these delightful bites in no time. They’re ideal for kids and adults alike, offering a perfect mix of flavors and a touch of spooky charm.
Ingredients
- 1 package of pre-made pizza dough
- 1 cup marinara sauce
- 2 cups shredded mozzarella cheese
- 1/2 cup cream cheese (softened)
- 1/2 teaspoon garlic powder
- 1/2 teaspoon Italian seasoning
- Black olives (sliced, for decoration)
Instructions
- Preheat your oven to 400°F (200°C) and line a baking sheet with parchment paper.
- Roll out the pizza dough on a floured surface until it’s about 1/4 inch thick. Cut the dough into small rounds (about 4 inches in diameter) and place them on the prepared baking sheet.
- Spread a tablespoon of marinara sauce on each round, leaving a small border around the edges.
- In a bowl, mix the softened cream cheese, garlic powder, and Italian seasoning until well combined. Transfer this mixture to a piping bag or a plastic bag with the corner snipped off.
- Pipe the cream cheese mixture in a spiral pattern on each pizza, starting from the center and working your way outward. Then, use a toothpick to drag lines from the center to the outer edges, creating a spider web effect.
- Sprinkle shredded mozzarella cheese over the top and add sliced black olives to represent spiders if desired.
- Bake in the preheated oven for 12-15 minutes, or until the crust is golden brown and the cheese is bubbly.
- Allow to cool for a few minutes before serving. Enjoy your spooky Spider Web Pizzas!
Ghostly Meringue Cookies
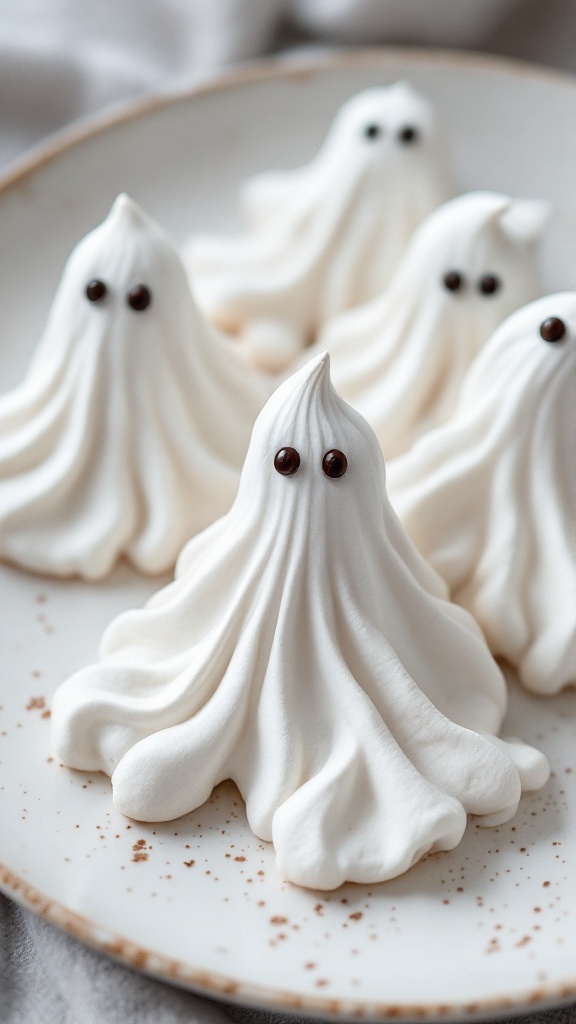
Ghostly meringue cookies are a delightful treat that brings a spooky twist to any Halloween gathering. These light, airy cookies have a crisp exterior and a chewy center, making them not only fun to look at but also enjoyable to eat. With just a few simple ingredients, you can whip up these charming desserts that will impress your guests without much fuss.
The sweetness of the meringue pairs beautifully with the playful ghostly shape, making them a perfect addition to your Halloween finger foods. They’re simple to make, so even novice bakers can create a batch of these delightful confections. Plus, they can be customized with different toppings for added flair!
Ingredients
- 3 large egg whites
- 1/4 teaspoon cream of tartar
- 3/4 cup granulated sugar
- 1 teaspoon vanilla extract
- Chocolate chips (for eyes)
Instructions
- Preheat your oven to 200°F (93°C) and line a baking sheet with parchment paper.
- In a clean bowl, beat the egg whites and cream of tartar using an electric mixer until soft peaks form.
- Gradually add the granulated sugar, continuing to beat until the mixture is glossy and forms stiff peaks. Stir in the vanilla extract.
- Spoon the meringue into a piping bag fitted with a star tip and pipe ghost shapes onto the prepared baking sheet.
- Press chocolate chips onto each meringue to create eyes.
- Bake for about 1.5 hours, then turn off the oven and let the cookies cool inside for another hour.
- Once cooled, the cookies can be served and enjoyed!
Tombstone Taco Dip Cups
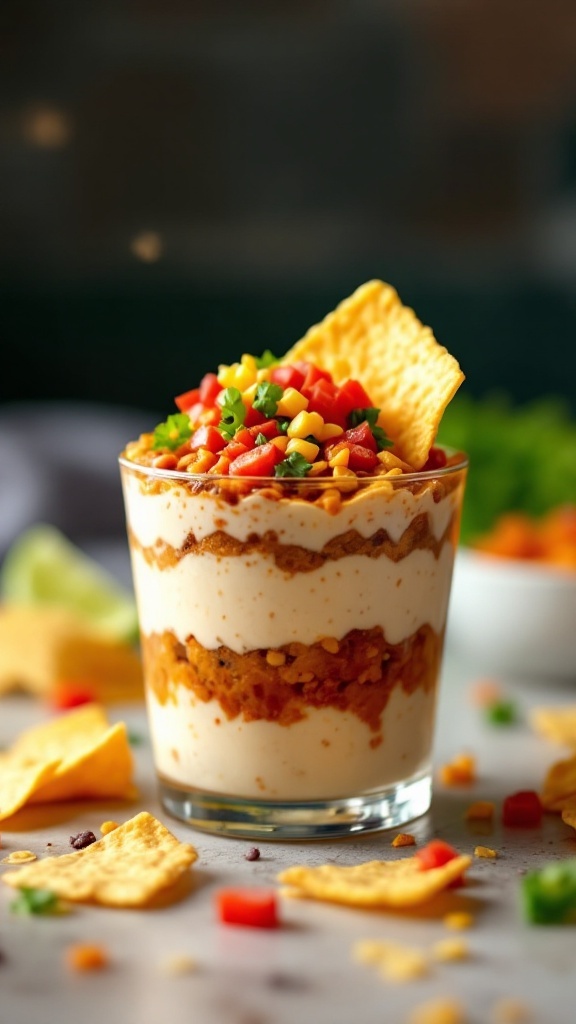
Tombstone Taco Dip Cups are a fun and festive way to serve up a delicious snack for any Halloween gathering. These layered cups combine seasoned ground beef, creamy cheese, and fresh veggies, all of which create a delightful burst of flavors with every bite. They’re not only tasty but also easy to whip up, making them a perfect choice for both novice and experienced cooks.
This recipe is all about combining textures and tastes, with crunchy tortilla chips providing a perfect contrast to the creamy dip. Ideal for parties, these taco dip cups can be prepared in advance, allowing you to enjoy the festivities without being stuck in the kitchen.
Ingredients
- 1 pound ground beef
- 1 packet taco seasoning
- 1 cup sour cream
- 1 cup cream cheese, softened
- 1 cup shredded cheddar cheese
- 1 cup diced tomatoes
- 1 cup sweet corn
- 1/4 cup chopped green onions
- Tortilla chips for serving
Instructions
- Cook the Beef: In a skillet over medium heat, cook the ground beef until browned. Drain excess fat and add the taco seasoning, mixing well. Follow package instructions for adding water and simmer until thickened.
- Prepare the Cheese Mixture: In a bowl, combine the softened cream cheese and sour cream. Mix until smooth and creamy.
- Layer the Cups: In small cups or glasses, start by adding a layer of the beef mixture. Follow with a layer of the cheese mixture, and then add diced tomatoes and sweet corn. You can repeat the layers if desired.
- Finish with Toppings: Top each cup with shredded cheddar cheese and chopped green onions for a fresh touch.
- Serve: Place a tortilla chip into each cup for easy dipping, and enjoy your spooky snack!
Witch’S Cauldron Cheese Dip
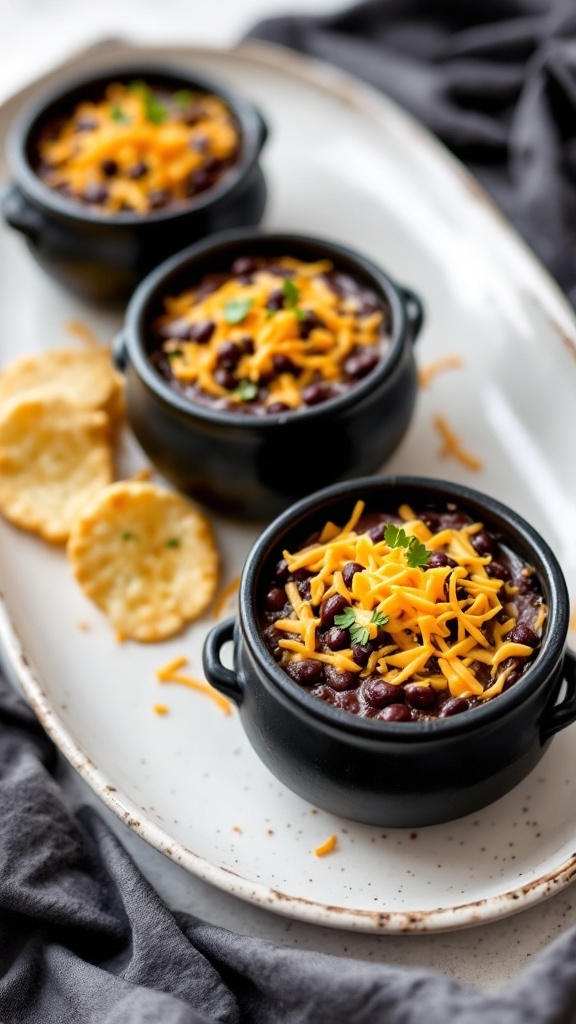
This Witch’s Cauldron Cheese Dip is a delightful and easy addition to your Halloween spread. Featuring a mix of creamy cheeses and savory spices, it delivers a rich, comforting taste that pairs perfectly with various dippers. You can whip it up in no time, making it a great choice for last-minute gatherings or spooky celebrations.
The dip is not only delicious but also visually fun, served in small cauldron-like bowls that add to the Halloween theme. It’s a real crowd-pleaser that will have your guests coming back for more. Plus, it’s versatile enough to be enjoyed with chips, crackers, or fresh veggies!
Ingredients
- 1 cup cream cheese, softened
- 1 cup shredded cheddar cheese
- 1/2 cup sour cream
- 1/4 cup mayonnaise
- 1 teaspoon garlic powder
- 1 teaspoon onion powder
- 1 teaspoon smoked paprika
- Salt and pepper to taste
- Chopped fresh herbs for garnish (optional)
Instructions
- In a mixing bowl, combine the cream cheese, cheddar cheese, sour cream, and mayonnaise. Mix until smooth.
- Add the garlic powder, onion powder, smoked paprika, salt, and pepper. Stir until all ingredients are well incorporated.
- Transfer the mixture to an oven-safe dish or small cauldron-like bowls.
- Bake in a preheated oven at 350°F (175°C) for about 15-20 minutes, or until the dip is hot and bubbly.
- Garnish with chopped herbs if desired, and serve warm with your choice of dippers.
Jack Skellington Oreos

Jack Skellington Oreos are a delightful treat that perfectly captures the spirit of Halloween. With their rich chocolate base and a sweet, creamy topping, these cookies bring a fun and festive vibe to any gathering. They’re simple to make, requiring just a few ingredients and minimal time in the kitchen, making them an ideal finger food for Halloween parties.
The cookies are not only visually appealing, resembling the iconic character from “The Nightmare Before Christmas,” but they also offer a delicious combination of flavors. Each bite features the familiar taste of Oreos enhanced with a white chocolate coating, making them irresistible to both kids and adults alike.
Ingredients
- 1 package of Oreo cookies
- 1 cup white chocolate chips
- Black food coloring gel
- Wax paper
Instructions
- Melt the white chocolate chips in a microwave-safe bowl in 30-second intervals, stirring until smooth.
- Dip each Oreo into the melted chocolate, ensuring it is fully coated. Use a fork to lift it out, allowing excess chocolate to drip off.
- Place the coated cookies on wax paper to set.
- Once the chocolate has hardened, use the black food coloring gel to draw Jack Skellington’s face on each cookie.
- Let the designs set for a few minutes before serving. Enjoy your spooky treats!
Pumpkin Spice Donut Holes
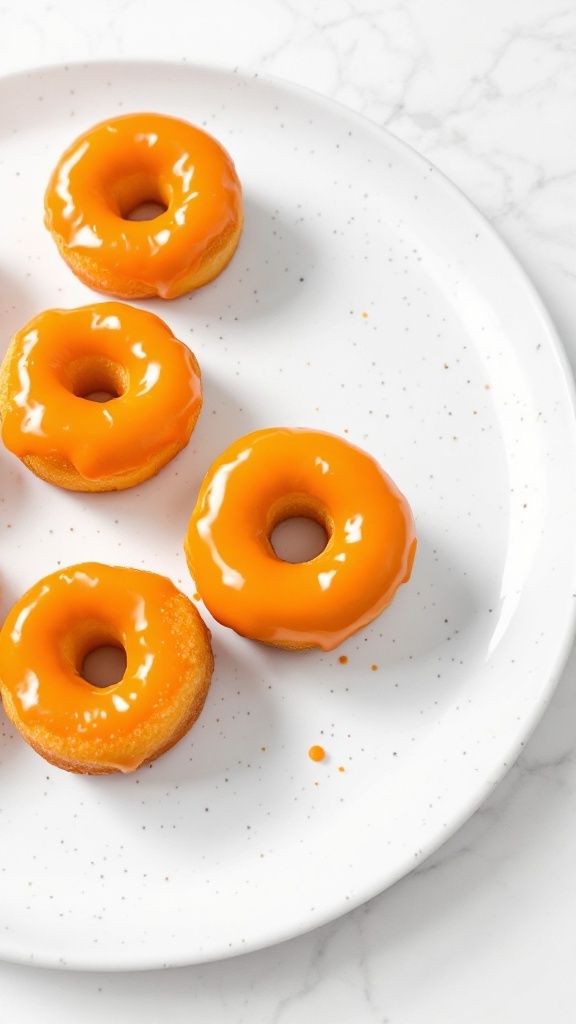
These pumpkin spice donut holes are a delightful treat, embodying the cozy flavors of fall. With a blend of warm spices and the sweetness of pumpkin, they offer a comforting bite that’s perfect for Halloween gatherings or autumn afternoons. Plus, they’re easy to whip up, making them a great choice for both novice and experienced bakers.
The texture is light and fluffy, while the glaze adds an irresistible sweetness. Whether you serve them at a Halloween party or enjoy them with a warm drink, these donut holes are sure to be a hit!
Ingredients
- 1 cup all-purpose flour
- 1/4 cup granulated sugar
- 1 teaspoon baking powder
- 1/2 teaspoon ground cinnamon
- 1/4 teaspoon ground nutmeg
- 1/4 teaspoon ground ginger
- 1/4 teaspoon salt
- 1/2 cup pumpkin puree
- 1/4 cup milk
- 1 large egg
- 2 tablespoons unsalted butter, melted
- 1/2 cup powdered sugar (for glaze)
- 1-2 tablespoons milk (for glaze)
- 1/2 teaspoon vanilla extract (for glaze)
Instructions
- Preheat your oven to 350°F (175°C) and grease a mini muffin pan.
- In a bowl, whisk together the flour, sugar, baking powder, cinnamon, nutmeg, ginger, and salt.
- In another bowl, mix the pumpkin puree, milk, egg, and melted butter until well combined.
- Add the wet ingredients to the dry ingredients and stir until just combined. Do not overmix.
- Spoon the batter into the mini muffin pan, filling each cavity about 2/3 full.
- Bake for 10-12 minutes, or until a toothpick inserted in the center comes out clean. Let them cool slightly in the pan, then transfer to a wire rack.
- For the glaze, whisk together the powdered sugar, milk, and vanilla extract until smooth. Adjust the consistency with more milk if needed.
- Dip the tops of the cooled donut holes into the glaze and let them set on a wire rack. Enjoy!