21 Spooktacular Halloween Desserts to Try This Year
Halloween desserts are all about creativity and fun! From spooky treats that look like monsters to sweet bites shaped like pumpkins, there’s no shortage of ways to indulge your sweet tooth this season.
Whether you’re whipping up something at home for a party or just looking to add a festive touch to your dessert table, these treats add a little thrill to the holiday festivities.
Graveyard Brownie Cups
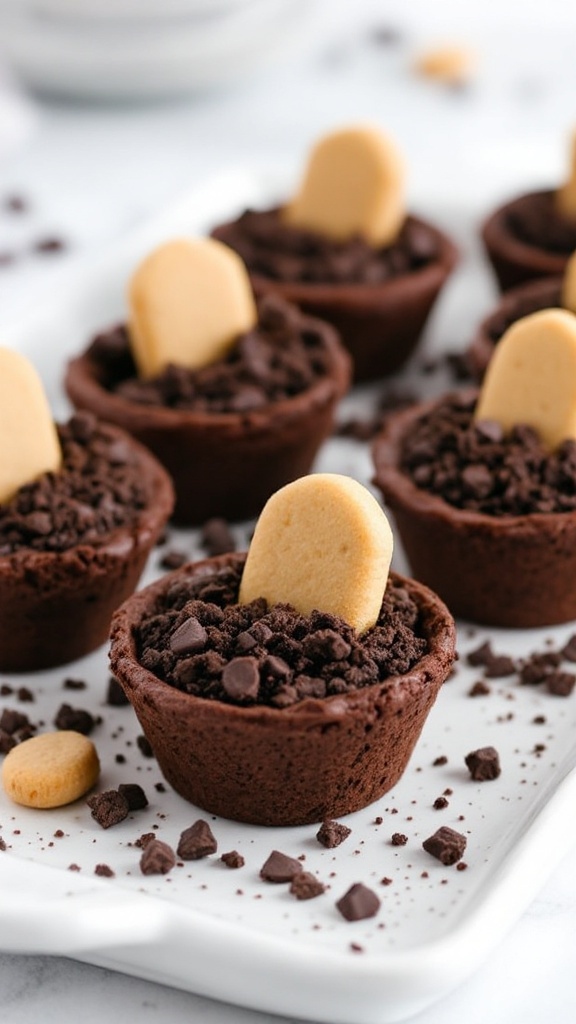
Graveyard brownie cups are a fun and tasty treat, perfect for Halloween gatherings. These adorable little desserts combine rich, fudgy brownies with a spooky twist, featuring cookie crumbles that resemble dirt and candy decorations that bring the graveyard to life. They’re easy to whip up, making them a great choice for both novice bakers and seasoned pros.
The flavor is a delightful mix of chocolatey goodness and sweet crunch, sure to satisfy any sweet tooth. With just a few simple ingredients, you can create these themed treats that are sure to impress your friends and family at your Halloween celebration.
Ingredients
- 1 box brownie mix
- 2 large eggs
- 1/4 cup vegetable oil
- 1/4 cup water
- 1 cup chocolate cookie crumbs
- Gummy worms or candy tombstones for decoration
- Powdered sugar (optional, for dusting)
Instructions
- Preheat your oven to the temperature indicated on the brownie mix box.
- In a mixing bowl, combine the brownie mix, eggs, vegetable oil, and water. Stir until just combined.
- Line a muffin tin with cupcake liners and fill each about 2/3 full with the brownie batter.
- Bake according to package directions or until a toothpick inserted comes out with a few moist crumbs.
- Let the brownie cups cool completely before decorating.
- Once cooled, top each brownie cup with chocolate cookie crumbs to create the ‘dirt’ effect.
- Add gummy worms or candy tombstones for a festive touch. Dust with powdered sugar for a ghostly look, if desired.
- Serve and enjoy your spooky graveyard brownie cups!
Spider Web Cheesecake
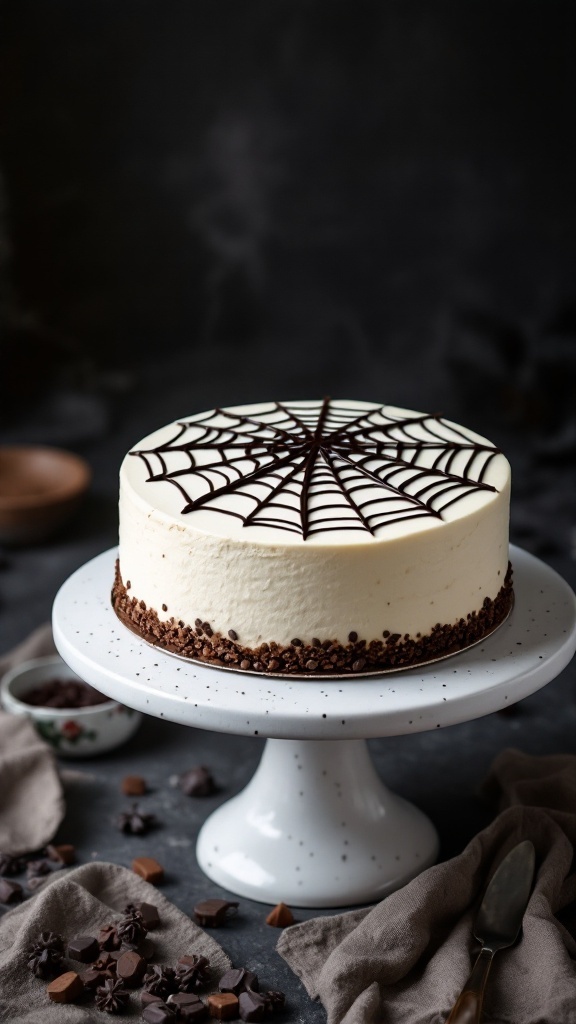
Spider Web Cheesecake is a fun and festive dessert that’s perfect for Halloween gatherings. With a rich, creamy filling and a chocolatey crust, this cheesecake strikes a great balance between indulgent and refreshing. It’s easy to make and can be prepared in advance, making it a stress-free option for your spooky celebrations.
The best part? The striking spider web design adds a playful touch that will impress your guests, while the delicious flavor keeps them coming back for more. This recipe combines simple ingredients to create a delightful dessert that everyone will love.
Ingredients
- 1 ½ cups chocolate cookie crumbs
- ¼ cup unsalted butter, melted
- 2 cups cream cheese, softened
- 1 cup granulated sugar
- 1 teaspoon vanilla extract
- 3 large eggs
- 1 cup sour cream
- ½ cup heavy cream
- 2 tablespoons cocoa powder
- ¼ cup dark chocolate, melted (for web design)
Instructions
- Prepare the Crust: Preheat your oven to 325°F (160°C). In a bowl, mix chocolate cookie crumbs and melted butter until combined. Press the mixture firmly into the bottom of a springform pan.
- Mix the Filling: In a large bowl, beat cream cheese with granulated sugar and vanilla until smooth. Add eggs one at a time, mixing well after each addition. Stir in sour cream until just combined.
- Pour the Filling: Pour the cheesecake mixture over the crust in the springform pan. Smooth the top with a spatula and bake for about 50-60 minutes, or until the center is set but still slightly wobbly.
- Cool and Chill: Allow the cheesecake to cool completely at room temperature, then refrigerate for at least 4 hours or overnight.
- Create the Spider Web: Once chilled, whip the heavy cream until soft peaks form. Spread it evenly over the top of the cheesecake. Use melted dark chocolate to pipe a spider web design on top.
Candy Corn Cupcakes
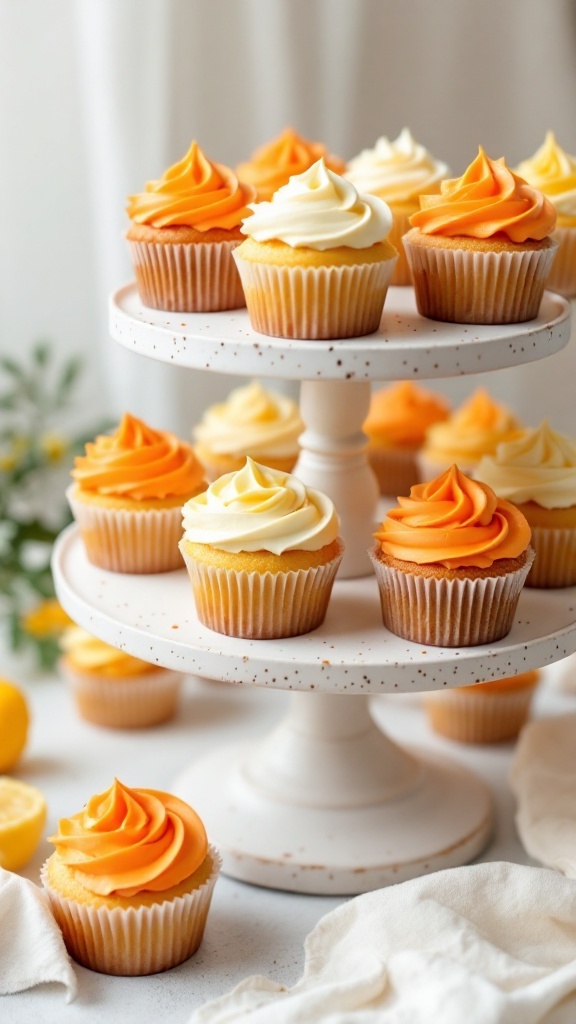
Candy Corn Cupcakes are a fun and festive treat perfect for celebrating Halloween. These delightful cupcakes combine a light, fluffy vanilla base with vibrant colors that mimic the iconic candy. With a simple recipe and easy-to-follow steps, these cupcakes are ideal for bakers of all skill levels. The sweet, buttery frosting is the cherry on top, bringing a delightful indulgence to each bite.
Not only do they taste delicious, but they also look great on any dessert table. The combination of yellow, orange, and white frosting creates a playful look that will delight both kids and adults alike. Let’s dive into making these colorful cupcakes!
Ingredients
- 1 ½ cups all-purpose flour
- 1 cup granulated sugar
- ½ cup unsalted butter, softened
- 2 large eggs
- 1/2 cup milk
- 1 teaspoon vanilla extract
- 2 teaspoons baking powder
- 1/4 teaspoon salt
- Yellow and orange food coloring
- 3 cups powdered sugar
- 1 cup unsalted butter, softened (for frosting)
- 2 teaspoons vanilla extract (for frosting)
- 2-4 tablespoons heavy cream (for frosting)
Instructions
- Preheat your oven to 350°F (175°C) and line a muffin tin with cupcake liners.
- In a mixing bowl, cream together the softened butter and granulated sugar until light and fluffy. Add in the eggs, one at a time, mixing well after each addition.
- Mix in the milk and vanilla extract until combined.
- In another bowl, whisk together the flour, baking powder, and salt. Gradually add the dry ingredients to the wet ingredients, mixing until just combined.
- Divide the batter evenly into three bowls. Leave one bowl as is, tint the second with yellow food coloring, and the third with orange food coloring.
- Spoon the batters into the cupcake liners, layering them for the candy corn effect: start with yellow, then orange, and finally the plain batter on top.
- Bake for 18-20 minutes or until a toothpick inserted into the center comes out clean. Allow cupcakes to cool completely.
- For the frosting, beat together the softened butter, powdered sugar, and vanilla extract until smooth. Add heavy cream as needed to reach desired consistency.
- Divide the frosting into three bowls and tint one yellow and the other orange. Use piping bags to frost the cupcakes, starting with the yellow, then orange, and adding a dollop of white on top.
Monster Eye Rice Krispie Treats
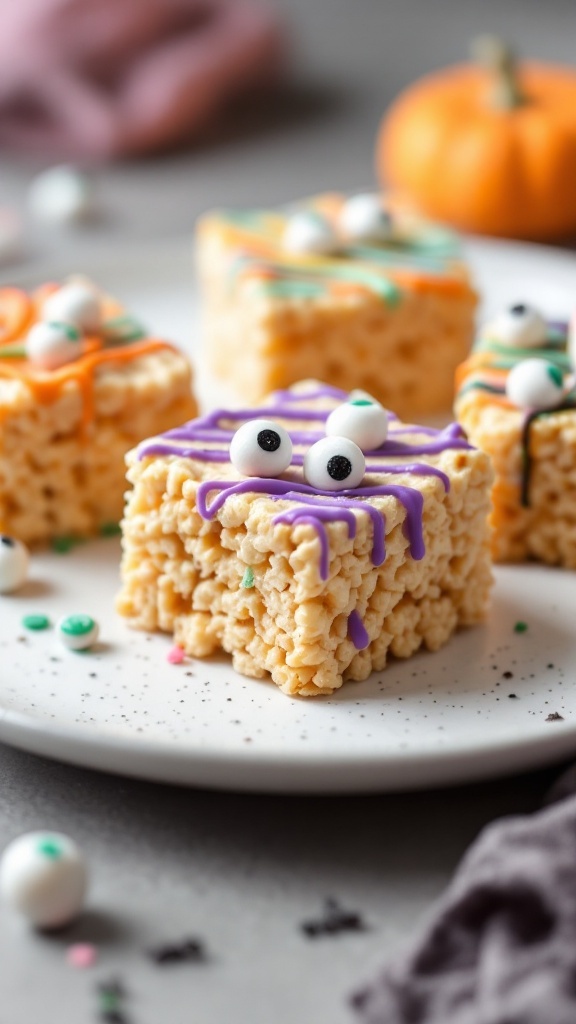
Monster Eye Rice Krispie Treats are a fun twist on the classic dessert that’s perfect for Halloween. These chewy squares are infused with a delicious buttery flavor and come adorned with colorful icing and candy eyes, making them look delightfully spooky!
This recipe is easy to whip up and requires just a few ingredients, making it ideal for both kids and adults to join in on the fun. Whether you’re hosting a Halloween party or just want a special treat to celebrate the season, these treats are sure to bring smiles.
Ingredients
- 4 cups Rice Krispies cereal
- 3 tablespoons unsalted butter
- 10 ounces mini marshmallows
- 1 teaspoon vanilla extract
- Food coloring (various colors)
- Candy eyes
Instructions
- Melt the Butter: In a large saucepan, melt the butter over low heat. Add the mini marshmallows and stir until completely melted and smooth. Remove from heat and stir in the vanilla extract.
- Add the Cereal: Slowly add the Rice Krispies cereal to the melted marshmallow mixture. Stir until all the cereal is well coated.
- Shape the Treats: Transfer the mixture to a greased 9×13 inch pan. Press it down evenly using a spatula or your hands, making sure it’s compact.
- Decorate: Once cooled, cut into squares. Use icing to create monster designs and place candy eyes on top for a fun touch.
- Serve: Enjoy your Monster Eye Rice Krispie Treats at your Halloween gathering!
Halloween Cookie Pizza
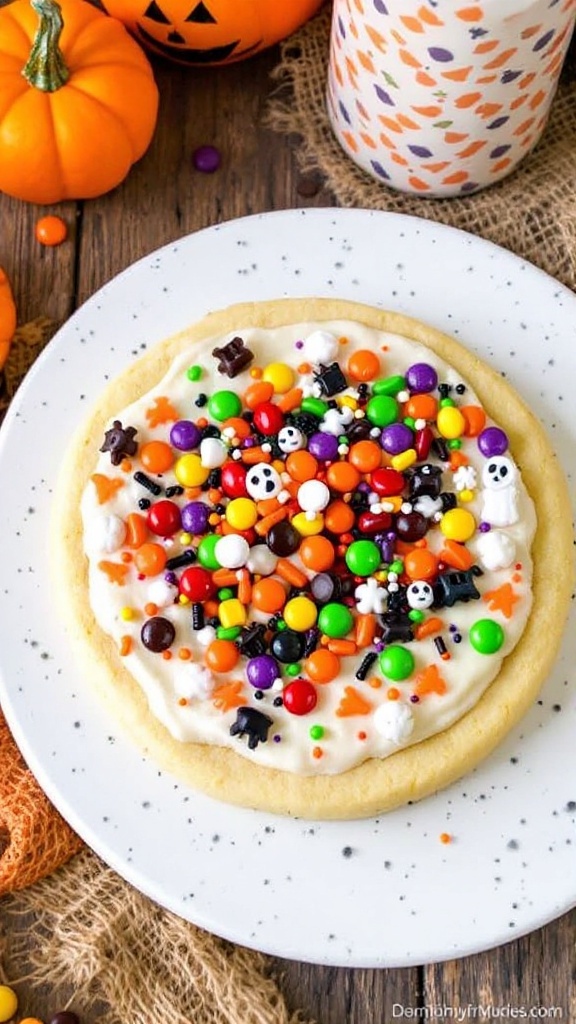
Halloween Cookie Pizza is a fun twist on traditional cookies that’s perfect for festive gatherings. This dessert combines the soft, chewy texture of a cookie with the playful presentation of a pizza, making it a hit among kids and adults alike. The flavors are sweet and buttery, and the colorful toppings add a cheerful touch to any Halloween celebration.
This recipe is simple to make, requiring basic ingredients and minimal effort. You can customize it with your favorite toppings, from candy corn to chocolate chips, making it a versatile dessert option for Halloween parties and spooky gatherings.
Ingredients
- 1 cup unsalted butter, softened
- 1 cup granulated sugar
- 1 cup brown sugar, packed
- 2 large eggs
- 2 teaspoons vanilla extract
- 3 cups all-purpose flour
- 1 teaspoon baking soda
- 1/2 teaspoon salt
- 1 cup chocolate chips or candy pieces
- Assorted Halloween candies for topping
Instructions
- Preheat the oven to 350°F (175°C). Grease a large pizza pan or line it with parchment paper.
- In a large bowl, cream together the softened butter, granulated sugar, and brown sugar until light and fluffy. Beat in the eggs one at a time, then stir in the vanilla extract.
- In another bowl, whisk together the flour, baking soda, and salt. Gradually add the dry ingredients to the wet mixture, mixing until just combined. Fold in the chocolate chips or candy pieces.
- Spread the cookie dough evenly onto the prepared pizza pan to form a large cookie crust.
- Bake for 15-20 minutes or until the edges are golden brown. Allow it to cool completely.
- Once cool, decorate your cookie pizza with assorted Halloween candies and enjoy!
Pumpkin Patch Chocolate Pudding Cups

Get ready for a delightful Halloween treat that combines the rich taste of chocolate with the festive charm of pumpkins! These Pumpkin Patch Chocolate Pudding Cups are a fun and easy dessert that’s perfect for parties or a cozy night in. The creamy chocolate pudding is topped with adorable mini pumpkin candies and crunchy cookie crumbles, making each bite a tasty adventure.
This recipe is simple enough for anyone to whip up, and it’s sure to be a hit with kids and adults alike. Whether you’re looking to impress guests or just indulge in a seasonal sweet, these pudding cups offer a delightful blend of flavors and textures that celebrate the spirit of Halloween.
Ingredients
- 2 cups milk
- 1/2 cup granulated sugar
- 1/3 cup unsweetened cocoa powder
- 1/4 cup cornstarch
- 1/4 teaspoon salt
- 1 teaspoon vanilla extract
- 1 cup whipped cream
- Mini pumpkin candies for decoration
- Crumble cookies for topping
Instructions
- Make the Pudding: In a medium saucepan, whisk together the milk, sugar, cocoa powder, cornstarch, and salt over medium heat. Stir constantly until the mixture thickens and starts to boil. Remove from heat and stir in the vanilla extract.
- Chill: Pour the chocolate pudding into individual cups and let them cool to room temperature. Then, cover and refrigerate for at least 2 hours to set.
- Top and Serve: Once the pudding is set, add a layer of whipped cream on top of each cup. Decorate with mini pumpkin candies and sprinkle cookie crumbles to create your pumpkin patch!
Ghost Meringue Cookies
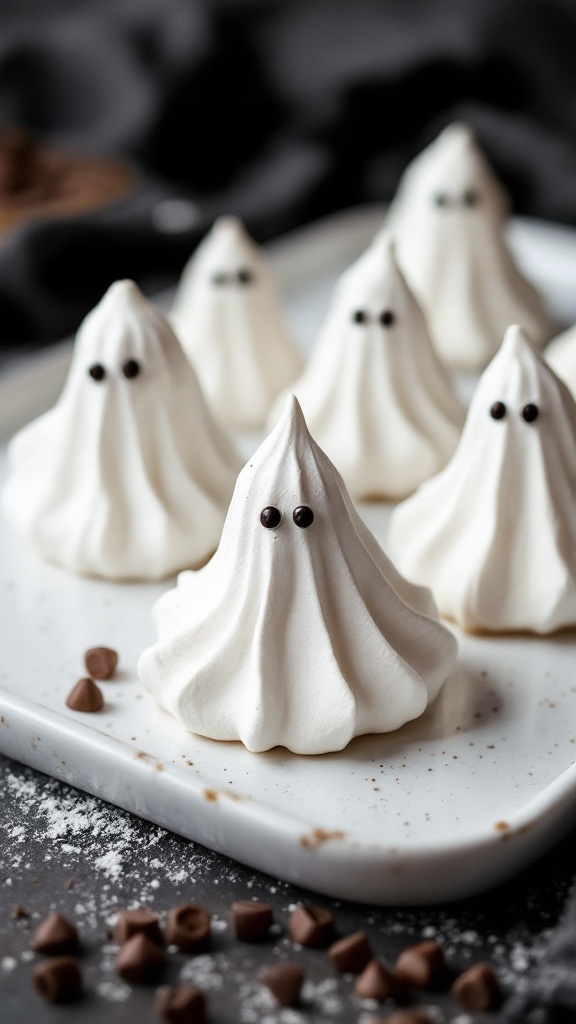
Ghost meringue cookies are a fun and whimsical treat that perfectly captures the spirit of Halloween. Light, airy, and slightly crisp on the outside, these meringues have a melt-in-your-mouth quality that makes them irresistible. They are sweetened just right and can be flavored with a hint of vanilla, creating a delightful contrast to their spooky appearance.
Making ghost meringue cookies is simple and a great way to involve kids in the kitchen. With just a few ingredients, you can create cute little ghostly figures that are sure to steal the show at any Halloween gathering. Plus, they are naturally gluten-free, making them a sweet option for various dietary needs.
Ingredients
- 3 large egg whites
- 1/4 teaspoon cream of tartar
- 3/4 cup granulated sugar
- 1 teaspoon vanilla extract
- Chocolate chips or black icing for decoration
Instructions
- Preheat your oven to 225°F (110°C) and line a baking sheet with parchment paper.
- In a large bowl, beat the egg whites and cream of tartar with an electric mixer until soft peaks form.
- Gradually add the granulated sugar while continuing to beat until the mixture becomes glossy and stiff peaks form.
- Add the vanilla extract and gently fold to combine.
- Using a piping bag fitted with a round tip, pipe ghost shapes onto the prepared baking sheet.
- Dot the meringues with chocolate chips or use black icing to create eyes.
- Bake for about 1-1.5 hours, or until the meringues are dry and can easily be lifted off the parchment paper.
- Turn off the oven and let them cool completely inside.
- Serve and enjoy your spooky ghost meringue cookies!
Bloody Brain Jello Mold

Get ready to surprise your guests with a spooky treat that’s both fun and easy to make! This Bloody Brain Jello Mold combines the classic taste of raspberry gelatin with a creepy twist that makes it perfect for your Halloween festivities. Its sweet and slightly tart flavor pairs well with the thrill of the holiday, making it a delightful addition to any dessert table.
Not only is this jello mold simple to whip up, but it also adds a playful element to your spooky celebrations. With just a few ingredients and minimal preparation time, you can create a dessert that will have everyone talking. Just remember to plan ahead, as it needs some time to chill and set in the fridge!
Ingredients
- 2 packages (3 oz each) raspberry gelatin
- 2 cups boiling water
- 1 cup cold water
- 1 can (14 oz) sweetened condensed milk
- 1/2 cup cold water (for the milk layer)
- Red food coloring (optional)
- Cooking spray (for mold)
Instructions
- Prepare the Jello: In a mixing bowl, dissolve the raspberry gelatin in 2 cups of boiling water. Stir until fully dissolved. Add the cold water and mix well.
- Set the Base: Lightly spray a brain-shaped mold with cooking spray to prevent sticking. Carefully pour half of the gelatin mixture into the mold and refrigerate for about 1 hour, until slightly set.
- Add the Creamy Layer: In another bowl, mix the sweetened condensed milk with 1/2 cup of cold water until smooth. Pour this mixture over the partially set gelatin layer in the mold.
- Finish with Jello: Pour the remaining gelatin mixture over the creamy layer. Return to the fridge and let it set completely, about 3-4 hours or overnight for best results.
- Unmold and Serve: Once fully set, carefully unmold the jello onto a serving platter. Optionally, drizzle some red food coloring over it for a bloody effect. Slice and serve chilled for a spooky Halloween treat!
Frankenstein Rice Krispie Squares
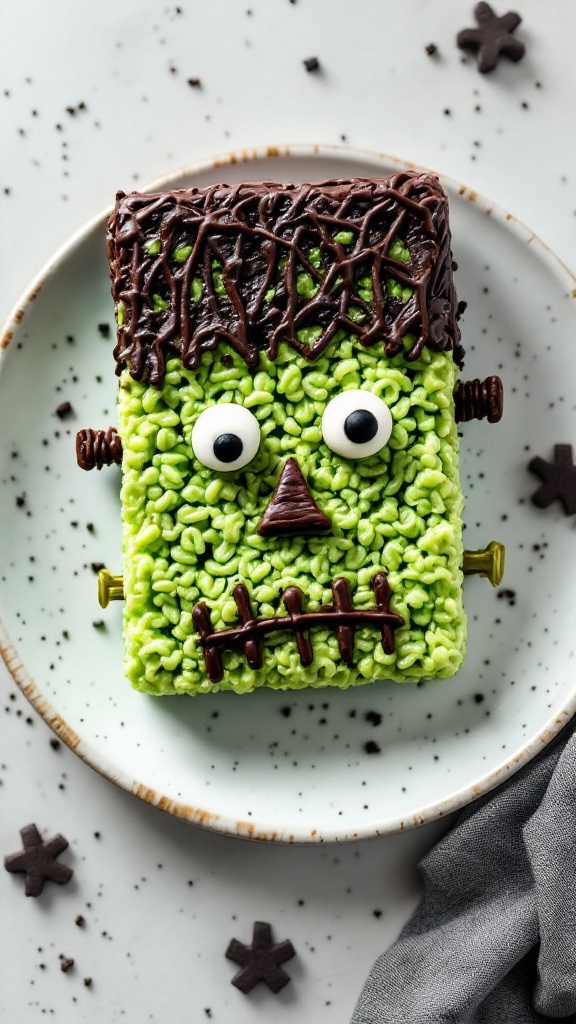
Frankenstein Rice Krispie Squares are a fun and spooky treat that’s perfect for Halloween. These squares combine the classic taste of marshmallow and crispy rice cereal with a playful twist, making them a hit among both kids and adults. They’re chewy, sweet, and have just a hint of chocolate, creating a deliciously satisfying dessert.
The best part? These treats are super simple to make! With just a few ingredients, you can transform ordinary Rice Krispie squares into a festive Frankenstein-inspired design. It’s a great activity for kids, and they can even help with the decorating!
Ingredients
- 6 cups Rice Krispies
- 1 package (10 oz) marshmallows
- 3 tablespoons unsalted butter
- 1/2 teaspoon green food coloring
- 1 cup chocolate chips
- 1/4 cup mini chocolate chips (for eyes)
- 1/4 cup chocolate frosting (for decorating)
- 1/4 cup pretzel sticks (for bolts)
Instructions
- Melt the Butter and Marshmallows: In a large saucepan, melt the butter over low heat. Add the marshmallows and stir until completely melted and smooth. Mix in the green food coloring until well blended.
- Add the Rice Krispies: Remove from heat and add the Rice Krispies cereal to the marshmallow mixture. Stir until all the cereal is evenly coated.
- Shape the Squares: Press the mixture into a greased 9×13-inch pan, spreading it out evenly. Allow it to cool for about 30 minutes.
- Decorate: Once cooled, cut the Rice Krispies into squares. Use chocolate frosting to create Frankenstein’s hair and facial features. Add mini chocolate chips for eyes and pretzel sticks for bolts on the sides.
- Serve and Enjoy: Your Frankenstein Rice Krispie Squares are now ready to impress at your Halloween gathering!
Haunted House Gingerbread
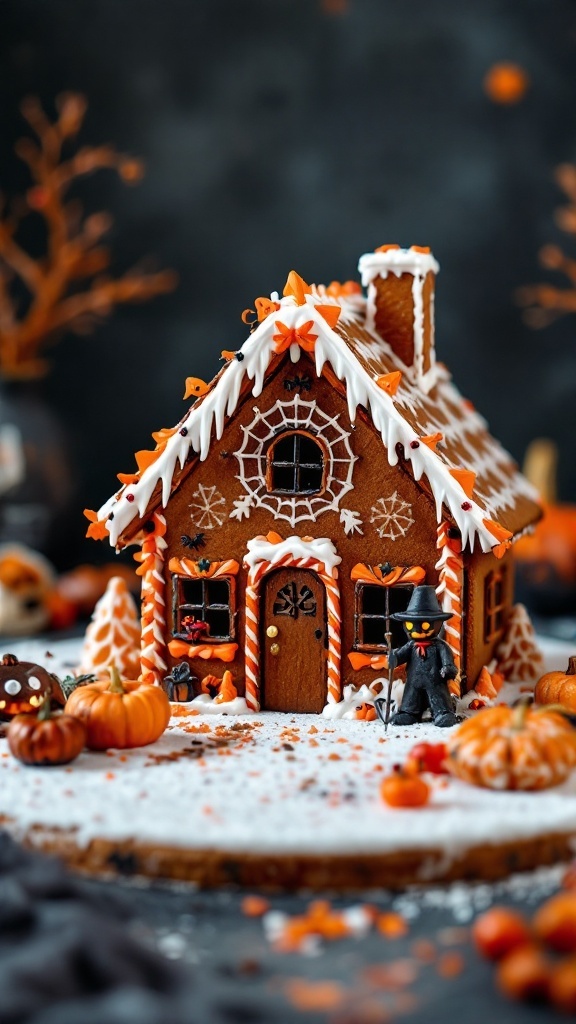
Creating a haunted house gingerbread is a delightful way to celebrate Halloween. The combination of spicy gingerbread and sweet icing makes for a treat that’s as tasty as it is fun to decorate. While it may seem intricate, constructing this spooky house can be quite simple and a great activity for families or friends to enjoy together.
The rich flavors of molasses and spices give the gingerbread a warm taste, while the colorful icing and candy decorations bring it to life. This recipe encourages creativity; you can customize your haunted house however you like, making it a unique centerpiece for your Halloween festivities!
Ingredients
- 3 cups all-purpose flour
- 1 tablespoon ground ginger
- 1 tablespoon ground cinnamon
- 1 teaspoon baking soda
- 1/4 teaspoon salt
- 1 cup unsalted butter, softened
- 1 cup brown sugar, packed
- 1 cup molasses
- 1 large egg
- 3-4 cups powdered sugar (for icing)
- 1/4 cup water (for icing)
- Assorted candies for decoration
Instructions
- Prepare the Dough: In a large bowl, whisk together the flour, ginger, cinnamon, baking soda, and salt. In another bowl, cream the butter and brown sugar until light and fluffy. Add molasses and egg, mixing until combined. Gradually add the dry ingredients to the wet ingredients, mixing until a dough forms.
- Chill the Dough: Cover the dough with plastic wrap and chill in the refrigerator for at least 1 hour.
- Cut Out Shapes: Preheat your oven to 350°F (175°C). Roll out the chilled dough on a floured surface to about 1/4-inch thickness. Use templates to cut out the pieces for your house, including walls, roof, and any additional decorations.
- Bake: Place the cutouts on a baking sheet lined with parchment paper. Bake for 10-12 minutes or until firm. Let cool completely on a wire rack.
- Make the Icing: In a bowl, mix powdered sugar with water until smooth and pipeable. Use this icing to assemble and decorate your gingerbread house.
- Assemble and Decorate: Use the icing to glue the house pieces together. Once assembled, let your creativity shine by decorating with assorted candies and additional icing details. Allow the icing to dry before displaying your haunted house.
Vampire Bite Cupcakes
Vampire Bite Cupcakes are a fun and spooky treat perfect for Halloween gatherings. With their rich chocolate flavor and a surprise filling, they are sure to delight both kids and adults. Topped with creamy frosting, these cupcakes have a playful yet elegant look that makes them stand out at any party.
Making these cupcakes is quite simple—perfect for bakers of all levels. The combination of chocolate cake and raspberry filling mimics the look of a vampire bite, while the frosting adds a soft and sweet touch. Get ready to impress your guests with this deliciously themed dessert!
Ingredients
- 1 3/4 cups all-purpose flour
- 1 cup granulated sugar
- 1/2 cup unsweetened cocoa powder
- 1 1/2 teaspoons baking powder
- 1 teaspoon baking soda
- 1/2 teaspoon salt
- 2 large eggs
- 1 cup whole milk
- 1/2 cup vegetable oil
- 2 teaspoons vanilla extract
- 1 cup boiling water
- 1 cup raspberry jam
- 2 cups heavy whipping cream
- 1/4 cup powdered sugar
- Red food coloring (optional)
Instructions
- Preheat your oven to 350°F (175°C). Line a cupcake pan with paper liners.
- In a large mixing bowl, combine the flour, sugar, cocoa powder, baking powder, baking soda, and salt. Stir to mix well.
- Add the eggs, milk, oil, and vanilla extract to the dry ingredients. Beat with an electric mixer on medium speed for about 2 minutes. Carefully stir in the boiling water until well blended.
- Fill each cupcake liner about halfway with the batter. Bake for 18-20 minutes, or until a toothpick inserted in the center comes out clean. Let them cool completely.
- Once cooled, use a small knife or cupcake corer to make a hole in the center of each cupcake. Fill the hole with raspberry jam.
- In a separate bowl, whip the heavy cream with powdered sugar until soft peaks form. Pipe or spread the whipped cream on top of each cupcake. If desired, add red food coloring to the cream for a more festive look.
Jack-O’-Lantern Hand Pies
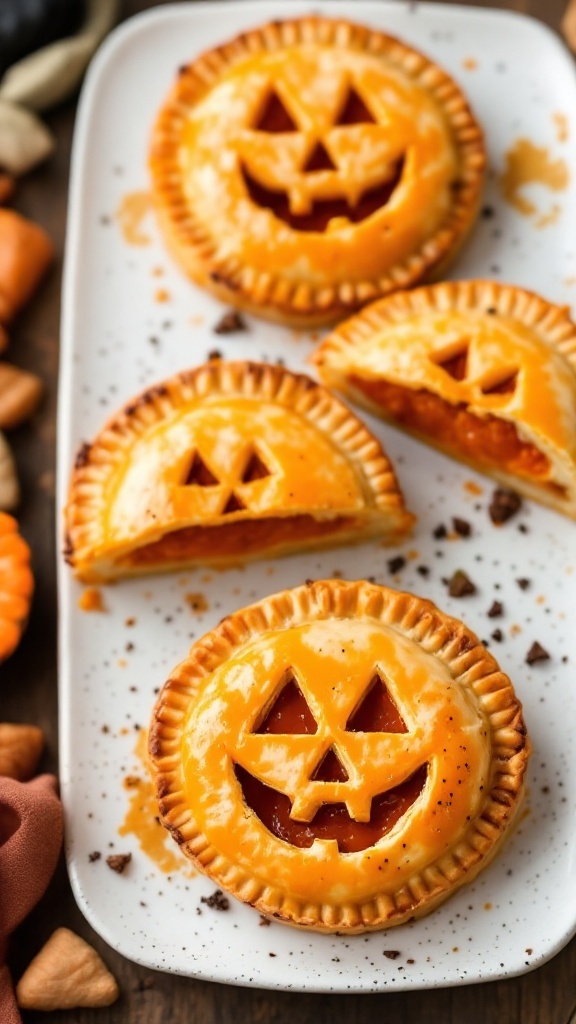
Jack-O’-Lantern hand pies are a delightful twist on traditional pumpkin desserts, combining a flaky crust with a sweet pumpkin filling. These little treats are not only fun to make, but they also offer a perfect balance of warmth and sweetness, making them ideal for your Halloween gatherings. Their playful pumpkin face adds a festive touch that kids and adults alike will enjoy.
Making these hand pies is simple and can be a great activity to share with family or friends. The crust comes together easily, and the filling requires just a few ingredients. Plus, they can be baked or fried, depending on your preference. Whether you’re hosting a Halloween party or simply looking to celebrate the season, these hand pies are sure to delight.
Ingredients
- 2 cups all-purpose flour
- 1/2 teaspoon salt
- 1/4 cup granulated sugar
- 1/2 cup unsalted butter, chilled and cubed
- 1/4 cup ice water
- 1 cup pumpkin puree
- 1/2 teaspoon ground cinnamon
- 1/4 teaspoon ground nutmeg
- 1/4 cup brown sugar, packed
- 1 egg, beaten (for egg wash)
Instructions
- Make the Dough: In a large bowl, mix together the flour, salt, and sugar. Add the chilled butter and mix until the mixture resembles coarse crumbs. Gradually add the ice water until the dough comes together. Wrap in plastic wrap and refrigerate for at least 30 minutes.
- Prepare the Filling: In a bowl, combine pumpkin puree, ground cinnamon, nutmeg, and brown sugar. Mix until well combined.
- Roll Out the Dough: Preheat your oven to 400°F (200°C). On a floured surface, roll out the chilled dough to about 1/8 inch thick. Cut out circles using a cookie cutter or a glass.
- Assemble the Pies: Place a small spoonful of pumpkin filling in the center of half the dough circles. Use a knife to cut a jack-o’-lantern face into the remaining circles. Place these on top of the filled circles and seal the edges with a fork.
- Brush and Bake: Place the hand pies on a baking sheet lined with parchment paper. Brush the tops with the beaten egg. Bake for 20-25 minutes, or until golden brown. Let cool slightly before serving.
Mummy Apple Pies
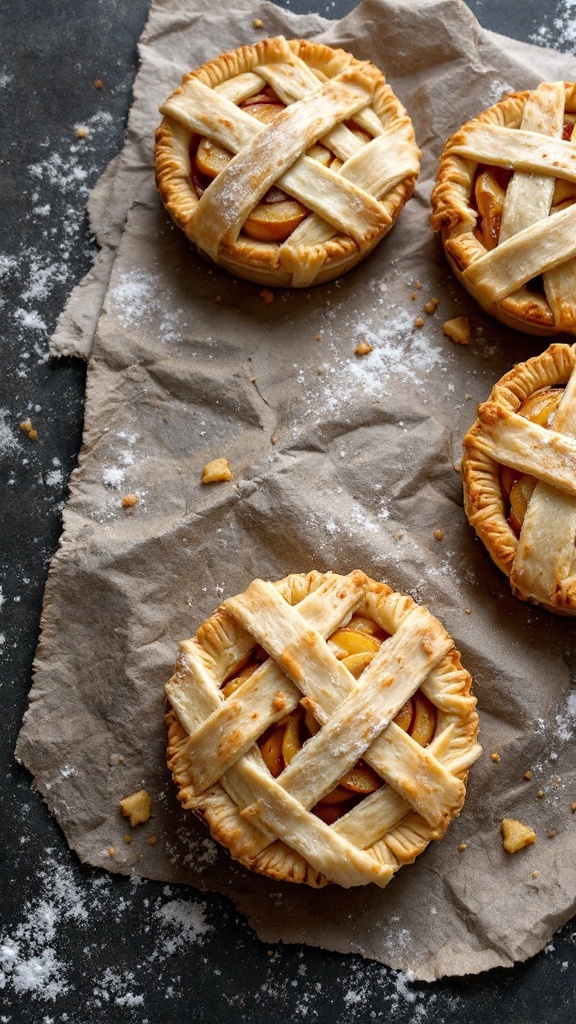
Mummy Apple Pies are a delightful treat that add a spooky twist to the classic apple pie. These mini pies are wrapped in a golden, flaky crust that resembles bandages, making them perfect for Halloween festivities. With a warm, spiced apple filling, they balance sweetness and a hint of tartness, making each bite comforting and delicious.
Making these mini pies is surprisingly simple, even for beginner bakers. You can whip them up in no time, and they are sure to be a hit at your Halloween gathering. Let’s gather our ingredients and get baking!
Ingredients
- 2 cups all-purpose flour
- 1/4 teaspoon salt
- 1/2 cup unsalted butter, chilled and cubed
- 5-6 tablespoons ice water
- 3-4 apples, peeled and diced
- 1/2 cup brown sugar
- 1 teaspoon cinnamon
- 1/4 teaspoon nutmeg
- 1 tablespoon lemon juice
- 1 egg, beaten (for egg wash)
Instructions
- Make the Pie Crust: In a bowl, mix flour and salt. Add the cubed butter and use a pastry cutter to blend until the mixture resembles coarse crumbs. Gradually add ice water, mixing until the dough comes together. Divide into two discs, wrap in plastic, and chill for 30 minutes.
- Prepare the Filling: In another bowl, combine diced apples, brown sugar, cinnamon, nutmeg, and lemon juice. Stir until the apples are well-coated.
- Roll Out the Dough: Preheat the oven to 375°F (190°C). On a floured surface, roll out one disc of dough to fit your mini pie pans. Cut out strips from the second disc for the “bandages.”
- Assemble the Pies: Place the rolled-out dough in the mini pie pans. Fill with the apple mixture, then create a lattice pattern on top with the dough strips. Brush with the beaten egg.
- Bake: Bake in the oven for 25-30 minutes, or until the crust is golden and the apples are tender. Let cool slightly before serving.
Candy Corn Fudge
Candy Corn Fudge is a delightful treat that captures the essence of Halloween in every bite. With its vibrant layers of sweet flavors reminiscent of the classic candy, this fudge is not only visually appealing but also incredibly tasty. It’s creamy, rich, and has just the right amount of sweetness, making it a hit among kids and adults alike.
This recipe is simple and straightforward, perfect for those who might not be baking experts. Just a few ingredients and some layering magic transform ordinary fudge into a festive delight. Plus, it’s a fun activity for the whole family!
Ingredients
- 2 cups white chocolate chips
- 1 can (14 ounces) sweetened condensed milk
- 1/2 teaspoon vanilla extract
- 3/4 cup yellow candy melts
- 3/4 cup orange candy melts
- 1/4 cup powdered sugar
- 1/2 teaspoon salt
Instructions
- Prepare the Pan: Line an 8×8 inch square baking dish with parchment paper, leaving some overhang for easy removal.
- Make the Base Layer: In a saucepan, melt the white chocolate chips and sweetened condensed milk over low heat, stirring constantly until smooth. Pour half of this mixture into the prepared dish and spread evenly.
- Prepare the Yellow Layer: In a separate bowl, melt the yellow candy melts according to package instructions. Stir in the powdered sugar and salt, then spread this mixture over the white layer in the baking dish.
- Add the Orange Layer: Repeat the melting process with the orange candy melts. Once melted and combined, pour this over the yellow layer and spread it evenly.
- Finish with the Remaining Mixture: Pour the remaining white chocolate mixture over the top, smoothing it out. Refrigerate for at least 2 hours until set.
- Cut and Serve: Once set, lift the fudge out of the pan using the parchment paper. Cut into squares and enjoy your festive Candy Corn Fudge!
Coffin-Shaped Brownies
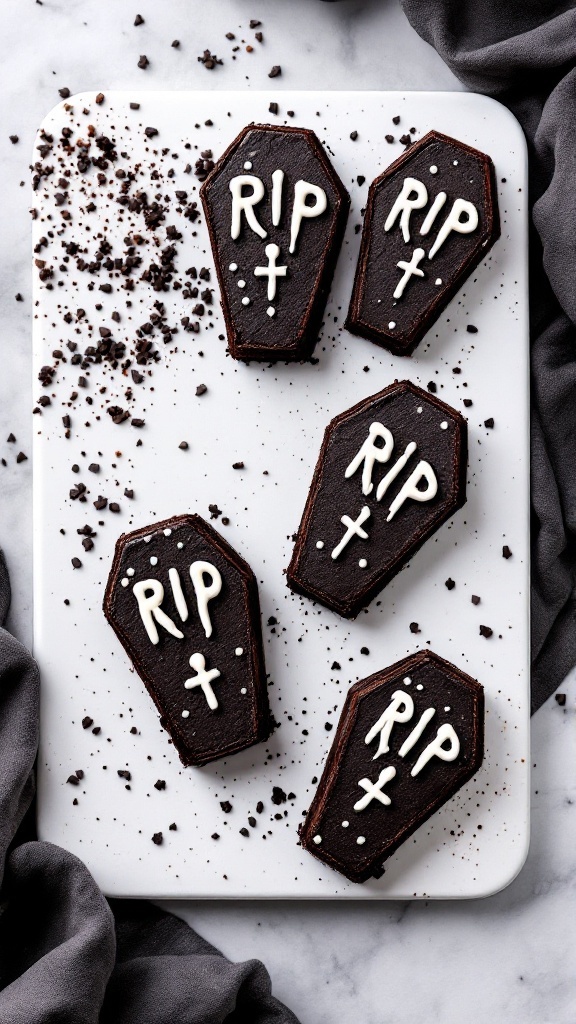
Coffin-shaped brownies are a fun and creative treat for Halloween. These rich, fudgy brownies are not only delicious but also bring a spooky flair to your dessert table. With a simple recipe, they’re easy to whip up, making them perfect for both seasoned bakers and those just starting out.
Each bite offers a chocolatey goodness that pairs perfectly with the festive design. Topped with white icing to spell out spooky messages or designs, these brownies are sure to impress your guests and add a playful element to your celebrations.
Ingredients
- 1 cup unsalted butter
- 2 cups granulated sugar
- 4 large eggs
- 1 teaspoon vanilla extract
- 1 cup all-purpose flour
- 1 cup unsweetened cocoa powder
- 1 teaspoon salt
- 1 teaspoon baking powder
- White frosting for decoration
Instructions
- Preheat your oven to 350°F (175°C) and grease a coffin-shaped brownie pan.
- In a large bowl, melt the butter and then stir in the sugar until well combined.
- Beat in the eggs one at a time, followed by the vanilla extract.
- Sift together the flour, cocoa powder, salt, and baking powder, and fold it into the wet mixture until just combined.
- Pour the batter into the prepared pan and smooth the top.
- Bake for 25-30 minutes, or until a toothpick inserted into the center comes out clean. Let cool completely.
- Once cooled, remove from the pan and decorate with white frosting to create your spooky designs.
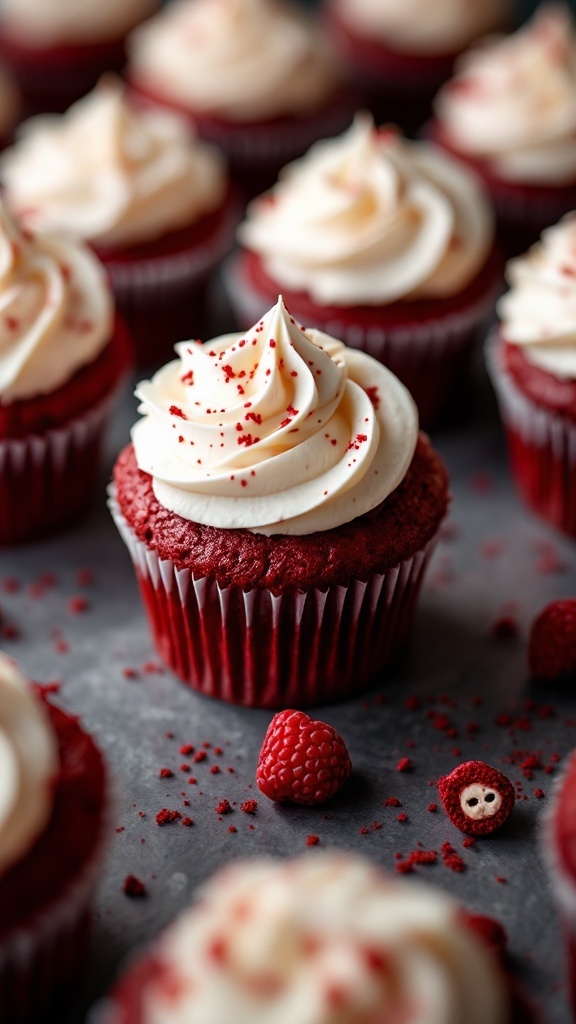
Bleeding Heart Cupcakes
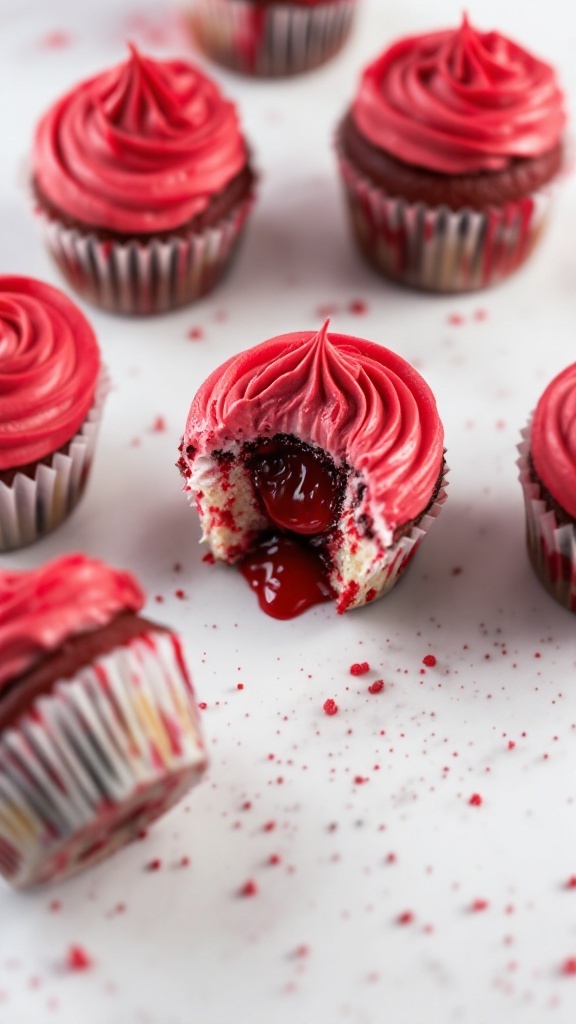
Baking for Halloween can be so much fun, especially when it comes to making these Bleeding Heart Cupcakes! These cupcakes are not only delicious but also add a spooky twist to your dessert table. They feature a moist cupcake filled with a luscious cherry filling that spills out like ‘blood’ when you take a bite. The rich flavor of chocolate combined with the sweet and tangy cherry filling creates a treat that’s both delightful and eerie.
This recipe is simple enough for both novice and experienced bakers. With just a few ingredients and some fun decorating, you can whip up a batch of these Halloween-themed cupcakes that will impress your guests and satisfy their sweet cravings!
Ingredients
- 1 ½ cups all-purpose flour
- 1 cup granulated sugar
- ½ cup unsweetened cocoa powder
- 1 tsp baking powder
- 1 tsp baking soda
- ½ tsp salt
- 1 cup buttermilk
- ½ cup vegetable oil
- 2 large eggs
- 1 tsp vanilla extract
- 1 cup cherry pie filling
- 1 cup butter, softened
- 4 cups powdered sugar
- 2-3 tbsp milk
- Red gel food coloring
Instructions
- Preheat your oven to 350°F (175°C) and line a cupcake tin with paper liners.
- In a mixing bowl, combine flour, sugar, cocoa powder, baking powder, baking soda, and salt. Mix well.
- In another bowl, whisk together buttermilk, vegetable oil, eggs, and vanilla extract until smooth. Gradually add the wet ingredients to the dry ingredients, mixing until just combined.
- Pour the batter into the prepared cupcake liners, filling each about two-thirds full. Bake for 18-20 minutes, or until a toothpick inserted in the center comes out clean. Let cool completely.
- Once cooled, use a small knife to cut a cone shape out of the center of each cupcake. Fill the hole with cherry pie filling.
- For the frosting, beat the softened butter until creamy. Gradually add powdered sugar and milk until you reach your desired consistency. Add red gel food coloring to achieve a vibrant red color.
- Frost the cupcakes with the red frosting, creating a swirl on top. Optionally, add more cherry filling on top for an extra spooky effect!
Spider Whoopie Pies

Spider Whoopie Pies are a fun twist on the classic dessert, perfect for Halloween! These chocolatey treats are sandwiched with a creamy filling and dressed up with playful spider legs made from candy. They not only taste delicious but also bring a spooky vibe to your dessert table.
Making Spider Whoopie Pies is quite simple, making it a great activity to share with family or friends. The rich chocolate flavor combined with the sweet filling creates a delightful balance that everyone will enjoy. Get ready to impress your party guests with these cute and tasty treats!
Ingredients
- 1 cup all-purpose flour
- 1/2 cup unsweetened cocoa powder
- 1 teaspoon baking soda
- 1/4 teaspoon salt
- 1/2 cup unsalted butter, softened
- 1 cup granulated sugar
- 2 large eggs
- 1 teaspoon vanilla extract
- 1 cup powdered sugar
- 1/4 cup cream cheese, softened
- 1/2 cup red licorice, cut into strips for legs
- Chocolate sprinkles for decoration
Instructions
- Preheat the oven to 350°F (175°C). Line a baking sheet with parchment paper.
- In a bowl, whisk together the flour, cocoa powder, baking soda, and salt. Set aside.
- In a large mixing bowl, cream together the softened butter and granulated sugar until light and fluffy. Add the eggs one at a time, mixing well, then stir in the vanilla extract.
- Gradually add the dry ingredients to the wet mixture, blending until just combined.
- Drop spoonfuls of batter onto the prepared baking sheet, spacing them a few inches apart. Bake for 10-12 minutes, or until the tops spring back when lightly pressed.
- While the cookies cool, prepare the filling by mixing the cream cheese and powdered sugar until smooth.
- Once the cookies are cool, spread a generous amount of filling on the flat side of one cookie, and sandwich it with another cookie.
- Finally, insert pieces of red licorice to resemble spider legs, and add chocolate sprinkles on top to complete your Spider Whoopie Pies!
Ghost S’Mores Dip
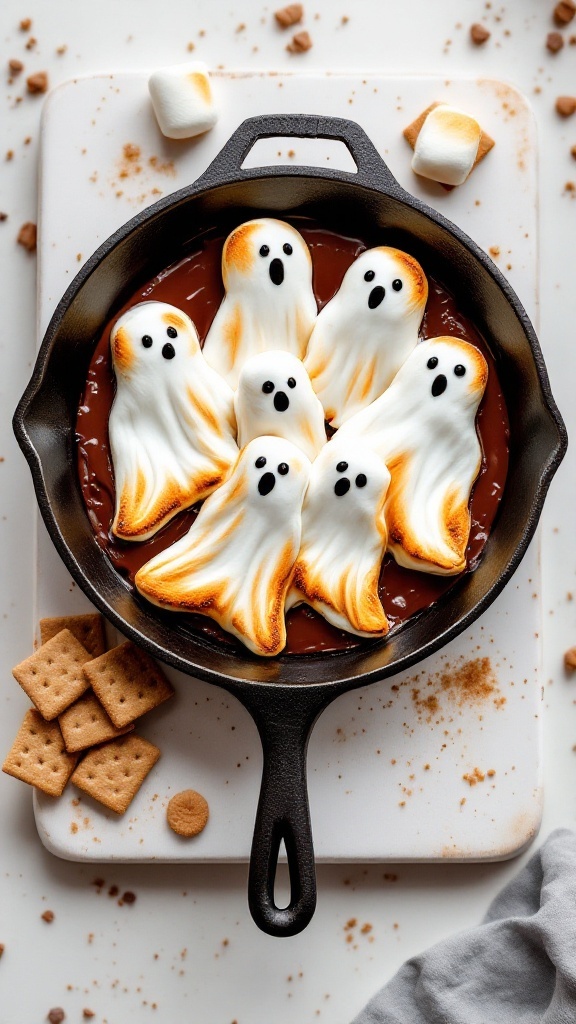
Ghost S’Mores Dip is a delightful twist on the classic campfire treat, perfect for celebrating Halloween. This sweet and gooey dessert combines rich chocolate with fluffy marshmallows shaped like little ghosts. The best part? It’s incredibly easy to whip up, making it a fun and interactive dessert for everyone.
The combination of melted chocolate and toasted marshmallows creates a warm, creamy dip that pairs beautifully with graham crackers. It’s a festive way to indulge and can be enjoyed with friends and family during spooky season gatherings.
Ingredients
- 1 cup chocolate chips
- 1 cup heavy cream
- 8-10 large marshmallows
- 1/4 cup mini chocolate chips (for eyes)
- Graham crackers (for dipping)
Instructions
- Preheat your oven to 400°F (200°C).
- In an oven-safe skillet, combine the chocolate chips and heavy cream. Stir until well combined.
- Bake in the preheated oven for about 5-7 minutes, or until the chocolate is melted and bubbly.
- Carefully remove the skillet and arrange the large marshmallows on top of the chocolate mixture.
- Return the skillet to the oven and broil for 1-2 minutes, watching closely until the marshmallows are golden brown.
- Remove from the oven and use mini chocolate chips to create eyes on the marshmallow ghosts.
- Serve immediately with graham crackers for dipping and enjoy your spooky treat!
Poison Apple Cake Pops
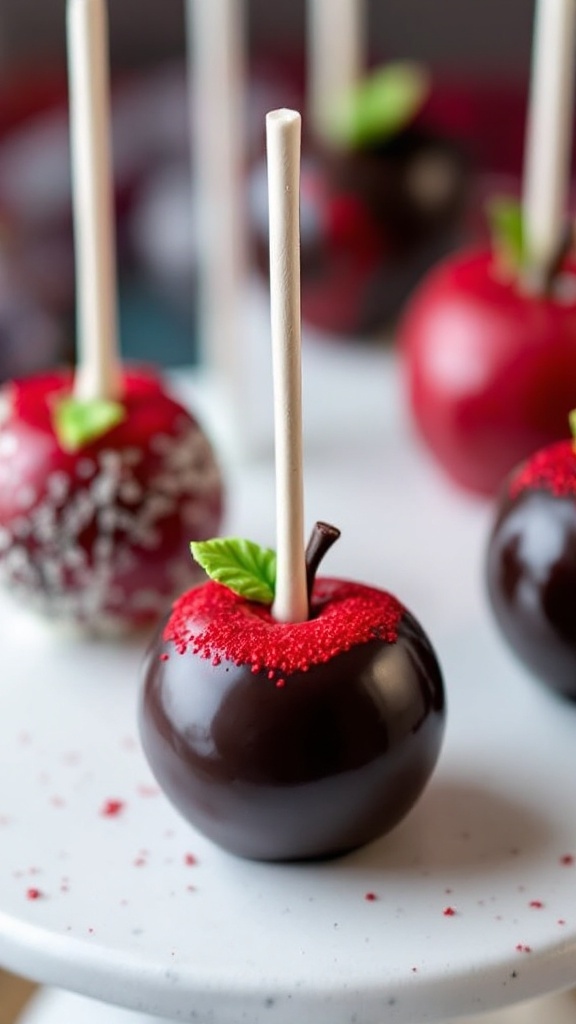
These Poison Apple Cake Pops bring a fun and spooky twist to your Halloween dessert table. With a deliciously sweet cake center covered in rich chocolate, they’re not only delightful to taste but also a visual treat. The combination of flavors and textures makes them a hit for both kids and adults alike.
Making these cake pops is pretty straightforward and can be a fun activity to do with friends or family. Just bake your favorite cake, crumble it, mix it with frosting, and shape it into apples. Dip them in chocolate and add some decorations to top it off. They’re sure to be an eye-catching addition to any Halloween celebration!
Ingredients
- 1 box of cake mix (any flavor)
- 1/2 cup frosting (matching the cake flavor)
- 1 cup chocolate candy melts (red and black)
- Sticks (lollipop or candy apple sticks)
- Green leaves or fondant for decoration
- Sprinkles (optional, for added flair)
Instructions
- Bake the Cake: Prepare the cake mix according to package instructions. Once baked, let it cool completely.
- Crumble the Cake: In a large bowl, crumble the cooled cake into fine crumbs. Mix in the frosting until well combined.
- Shape the Cake Pops: Using your hands, take small portions of the cake mixture and shape them into apple-like spheres. Insert a stick into each ball and place them on a baking sheet.
- Chill: Refrigerate the cake pops for about 30 minutes to help them hold their shape.
- Melt the Chocolate: While the pops chill, melt the chocolate candy melts in a microwave-safe bowl, stirring until smooth.
- Dip the Cake Pops: Remove the pops from the refrigerator. Dip each cake pop into the melted chocolate, allowing excess chocolate to drip off. Place them back on the baking sheet.
- Add Decorations: Before the chocolate sets, add sprinkles or attach the green leaves for a more realistic look.
- Let Them Set: Allow the cake pops to cool and harden completely before serving.
Mummy Pumpkin Cookies
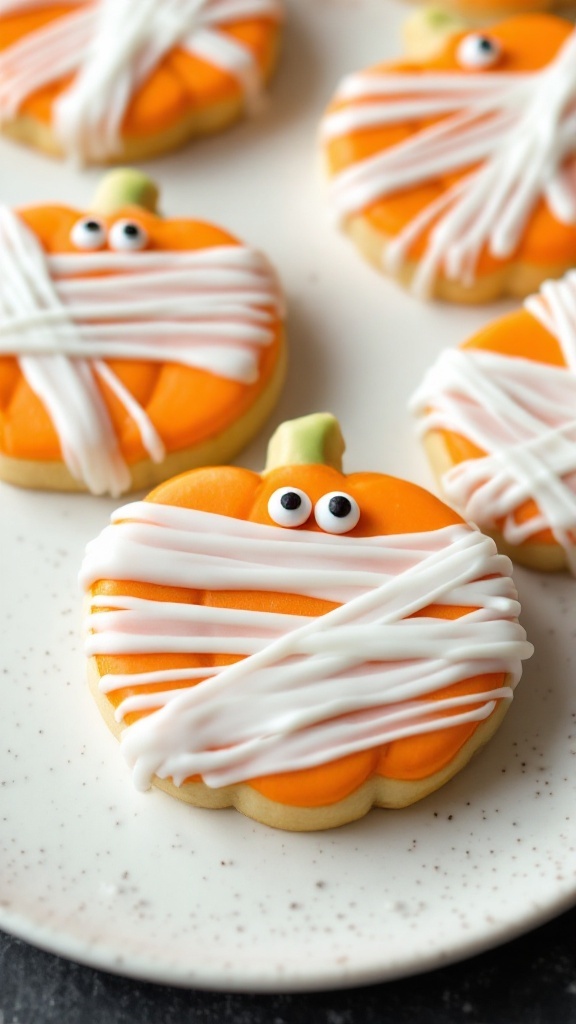
Mummy Pumpkin Cookies are a delightful treat that perfectly captures the spirit of Halloween. These cute, little cookies are not only fun to make but also offer a blend of soft and chewy textures with a sweet, pumpkin spice flavor that everyone will love. They are simple enough for kids to help with, making them a perfect activity for a chilly fall afternoon.
The cookies are decorated to resemble adorable mummies, complete with white icing and candy eyes, bringing a playful touch to your Halloween festivities. Whether you’re hosting a party or just looking to satisfy a seasonal craving, these cookies will surely be a hit!
Ingredients
- 2 cups all-purpose flour
- 1 teaspoon baking soda
- 1/2 teaspoon baking powder
- 1 teaspoon ground cinnamon
- 1/2 teaspoon ground nutmeg
- 1/4 teaspoon ground ginger
- 1/2 teaspoon salt
- 1 cup pumpkin puree
- 1/2 cup granulated sugar
- 1/2 cup brown sugar, packed
- 1/2 cup unsalted butter, softened
- 1 large egg
- 1 teaspoon vanilla extract
- 2 cups white chocolate melting wafers
- Edible candy eyes
Instructions
- Preheat your oven to 350°F (175°C) and line a baking sheet with parchment paper.
- In a bowl, mix together the flour, baking soda, baking powder, cinnamon, nutmeg, ginger, and salt. Set aside.
- In another bowl, cream together the softened butter, granulated sugar, and brown sugar until smooth. Beat in the pumpkin puree, egg, and vanilla extract until well combined.
- Gradually add the dry ingredients to the wet mixture, stirring until just combined.
- Drop tablespoon-sized scoops of dough onto the prepared baking sheet, spacing them about 2 inches apart. Bake for 10-12 minutes, or until the edges are lightly golden.
- Allow the cookies to cool completely on a wire rack.
- Melt the white chocolate wafers in a microwave-safe bowl in short bursts until smooth. Drizzle the melted chocolate over the cooled cookies to create mummy wrappings. Place candy eyes on top before the chocolate sets.