11 Spooky Halloween Cake Pop Ideas to Delight Your Guests
Halloween cake pops are a delightful treat that adds a splash of fun to any spooky celebration. These bite-sized delights come in various festive designs, making them an easy and playful addition to your Halloween festivities. Whether you’re hosting a party, trick-or-treating, or just indulging in some seasonal sweets, cake pops are sure to bring a smile to your face.
Jack-O’-Lantern Cake Pops (Orange With Carved Faces)
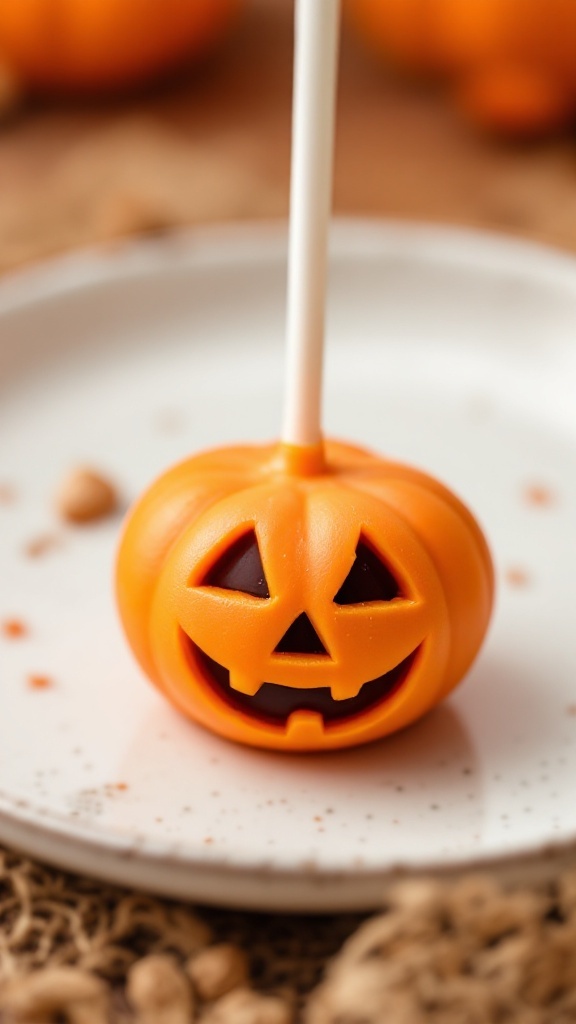
These Jack-O’-Lantern cake pops are the perfect treat for Halloween, combining fun and flavor in one bite-sized delight. They have a sweet, moist cake center, covered in a smooth, orange coating, making them not only tasty but also visually appealing.
Easy to make, these cake pops are a great activity for kids and adults alike. You can customize the faces and get creative with designs, ensuring each pop has its unique character. Get ready to impress your friends and family with these festive treats!
Ingredients
- 1 box of cake mix (any flavor)
- 1 cup frosting (store-bought or homemade)
- 12 ounces orange candy melts
- Cake pop sticks
- Black edible marker or chocolate for decorating
Instructions
- Bake the Cake: Prepare the cake mix according to package instructions and bake in a 9×13 inch pan. Once baked, let it cool completely.
- Make the Cake Pop Mixture: Crumble the cooled cake into a large bowl. Add frosting, mixing until fully combined. Roll the mixture into small balls, about 1 inch in diameter.
- Chill the Balls: Place the cake balls on a baking sheet lined with parchment paper and refrigerate for at least 30 minutes until firm.
- Melt the Candy Coating: In a microwave-safe bowl, melt the orange candy melts according to package instructions, stirring until smooth.
- Dip the Sticks: Dip the tip of each cake pop stick into the melted candy and then insert it into a cake ball. This helps to secure the stick in place.
- Coat the Cake Pops: Dip each cake pop into the melted orange candy until fully coated, letting any excess drip off. Place them back on the parchment paper.
- Decorate: Once the coating has set, use a black edible marker or melted chocolate to draw Jack-O’-Lantern faces on each pop. Get creative!
- Enjoy: Once decorated, your Jack-O’-Lantern cake pops are ready to be enjoyed. They make a great addition to any Halloween party!
Mummy Cake Pops (Wrapped In White Chocolate
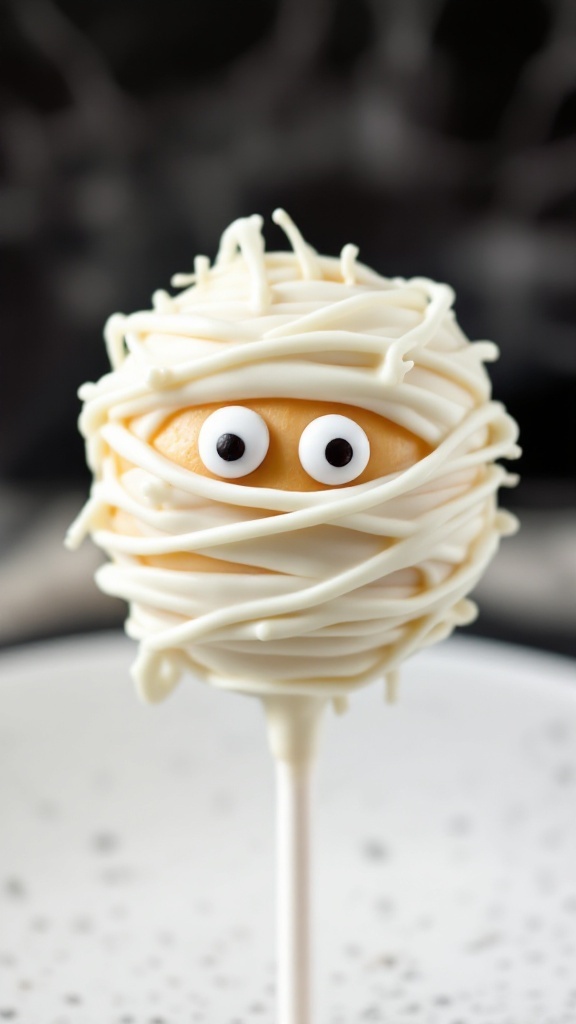
Mummy cake pops are a delightful Halloween treat that combines the rich flavors of cake and creamy white chocolate. The soft, moist cake is transformed into fun, spooky pops that are simple and enjoyable to make. Perfect for a Halloween party or a festive gathering, these treats are sure to excite both kids and adults alike!
The cake pops are coated in smooth white chocolate that gives them a ghostly appearance, while the drizzle adds to the mummy effect. With just a few ingredients and steps, you can create these fun treats that are as tasty as they are adorable.
Ingredients
- 1 box cake mix (any flavor)
- 1/2 cup frosting (store-bought or homemade)
- 12 oz white chocolate or candy melts
- Edible eyes (for decoration)
- Sprinkles (optional)
Instructions
- Bake the Cake: Prepare the cake mix according to package instructions. Once baked, let it cool completely.
- Make the Cake Balls: Crumble the cooled cake in a large bowl. Add frosting gradually until the mixture holds together. Roll into balls and place on a baking sheet.
- Chill the Cake Balls: Refrigerate the cake balls for about 30 minutes to firm them up.
- Melt the Chocolate: In a microwave-safe bowl, melt the white chocolate or candy melts in 30-second intervals, stirring until smooth.
- Dip and Decorate: Insert a lollipop stick into each cake ball, dip into the melted chocolate, and let excess drip off. Use a piping bag to drizzle more melted chocolate over the pops to create the mummy wrapping. Add edible eyes before the chocolate sets.
- Let Set: Place the finished cake pops in a foam block or stand until the chocolate is completely set. Enjoy your spooky mummy cake pops!
Frankenstein Monster Cake Pops (Green With Bolts And Stitches)
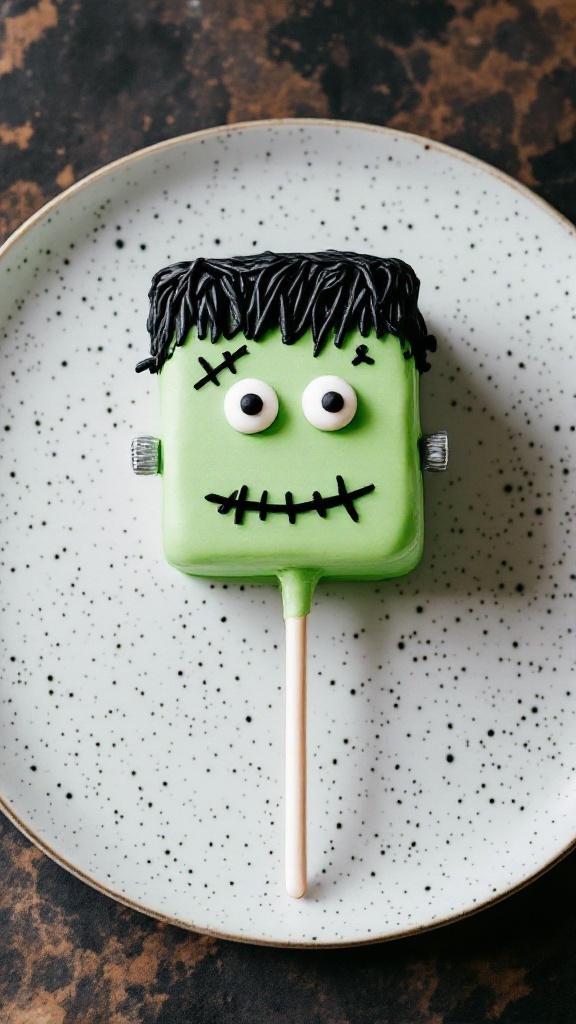
These Frankenstein Monster Cake Pops are a delightful Halloween treat that brings a fun twist to your spooky celebrations. With a sweet, moist cake base coated in vibrant green chocolate, they not only taste delicious but also look adorable! They’re simple to make, making them a great project for baking with kids or for impressing guests at a Halloween party.
The combination of rich chocolate flavor with the colorful decorations will surely bring smiles all around. Plus, they can be customized with different expressions, giving each cake pop its unique character. Let’s dive into the recipe so you can whip up this tasty treat!
Ingredients
- 1 box chocolate cake mix
- 3 large eggs
- 1/2 cup vegetable oil
- 1 cup water
- 1 cup green candy melts
- Black icing for decoration
- Edible eyes
- Wooden sticks or lollipop sticks
Instructions
- Bake the Cake: Preheat your oven according to the cake mix instructions. Prepare a 9×13 inch baking pan, and mix the cake batter using the chocolate cake mix, eggs, oil, and water. Pour into the pan and bake until a toothpick comes out clean (about 30-35 minutes).
- Prepare the Cake Crumbs: Once cooled, crumble the cake into a large bowl until fine. You can use your hands or a fork for this.
- Form the Cake Pops: Mix in a bit of frosting (about 1/2 cup) to the crumbled cake. Roll the mixture into small balls and place them on a baking sheet lined with parchment paper. Insert sticks into the balls and freeze for about 30 minutes.
- Coat the Cake Pops: Melt the green candy melts according to package instructions. Dip each cake pop into the melted candy, ensuring they are fully coated. Allow excess to drip off before placing them back onto the parchment paper.
- Decorate: Once the coating is set, use black icing to add bolts and stitches. Place the edible eyes to finish the look. Allow them to harden completely before serving.
Witch Cake Pops (With Green Faces And Black Hats)
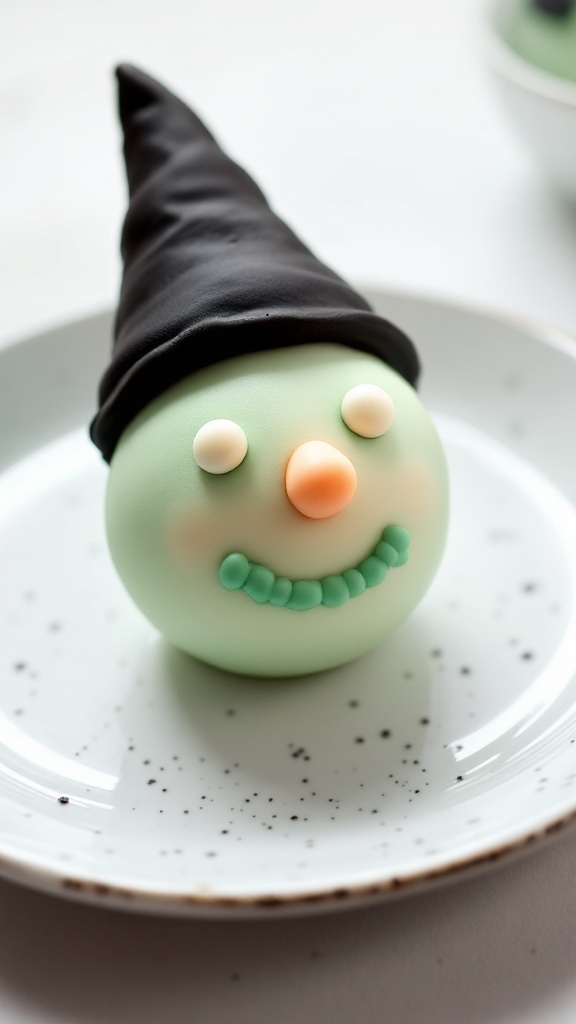
These Witch Cake Pops are not only delightful to look at but also a treat for the taste buds! With their fun green faces and stylish black hats, they capture the spirit of Halloween perfectly. Made using simple ingredients, they are easy to whip up, making them a great activity for both kids and adults during the spooky season.
The cake pops are moist and flavorful, combining a classic cake with a fun twist. Whether you’re serving them at a Halloween party or just enjoying a sweet snack, these treats are bound to put a smile on everyone’s face.
Ingredients
- 1 box of chocolate cake mix
- 3 eggs
- 1 cup of water
- 1/2 cup of vegetable oil
- 1 can of chocolate frosting
- Green candy melts
- Black fondant
- White candy eyes
- Orange candy for the nose
- Green candy for the mouth
- Lollipop sticks
Instructions
- Prepare the Cake: Bake the chocolate cake according to the package instructions and let it cool completely.
- Crumble the Cake: Once cooled, crumble the cake into a large bowl. Mix in the chocolate frosting until fully combined.
- Shape the Pops: Form small balls of the cake mixture and insert lollipop sticks into each ball. Place them in the fridge for about 30 minutes to firm up.
- Melt the Candy: In a microwave-safe bowl, melt the green candy melts according to package instructions until smooth.
- Coat the Cake Pops: Dip each chilled cake pop into the melted green candy, allowing excess to drip off. Place on a parchment-lined baking sheet.
- Add Features: While the coating is still wet, add the candy eyes, orange noses, and green mouths. Allow the pops to set.
- Make Hats: Roll out the black fondant and cut it into hat shapes. Attach these hats to the top of the cake pops for that witchy touch.
- Let Set: Allow the cake pops to fully harden before serving.
Vampire Cake Pops (With Fangs And
These Vampire Cake Pops are a delightful and spooky treat for your Halloween celebrations. With a rich cake center covered in smooth white chocolate and adorned with fang-like decorations, they’re sure to bring a fun twist to any dessert table. The combination of sweet chocolate and moist cake pairs perfectly, creating a treat that kids and adults will both love.
This recipe is simple enough for bakers of all levels. You can easily customize the flavors and decorations to suit your preferences, making them a versatile option for Halloween gatherings.
Ingredients
- 1 box cake mix (your choice of flavor)
- 1 cup frosting (store-bought or homemade)
- 12 ounces white chocolate or candy melts
- 1 tablespoon coconut oil (optional, for thinning chocolate)
- Black decorating gel or chocolate for fangs
- Candy eyes for decoration
- Lollipop sticks
- Sprinkles for coating (optional)
Instructions
- Bake the Cake: Prepare and bake the cake as per package instructions. Allow it to cool completely.
- Make the Cake Pop Mixture: Crumble the cooled cake into a large bowl. Add frosting gradually, mixing until the mixture holds together but isn’t too sticky.
- Form the Balls: Take small portions of the cake mixture and roll them into balls, about 1 inch in diameter. Place them on a baking sheet lined with parchment paper.
- Chill: Insert lollipop sticks into each cake ball and refrigerate for at least 30 minutes to firm up.
- Melt the Chocolate: In a microwave-safe bowl, melt the white chocolate or candy melts, adding coconut oil if desired. Stir until smooth.
- Coat the Cake Pops: Dip each chilled cake pop into the melted chocolate, allowing the excess to drip off. Place them back on the parchment paper.
- Add Decorations: While the chocolate is still wet, use black gel or melted chocolate to create fang shapes on each pop. Stick on the candy eyes.
- Let Set: Allow the chocolate to harden at room temperature or chill briefly in the fridge. Serve and enjoy your spooky Vampire Cake Pops!
Zombie Brain Cake Pops (Pink With Brain Texture Piping)
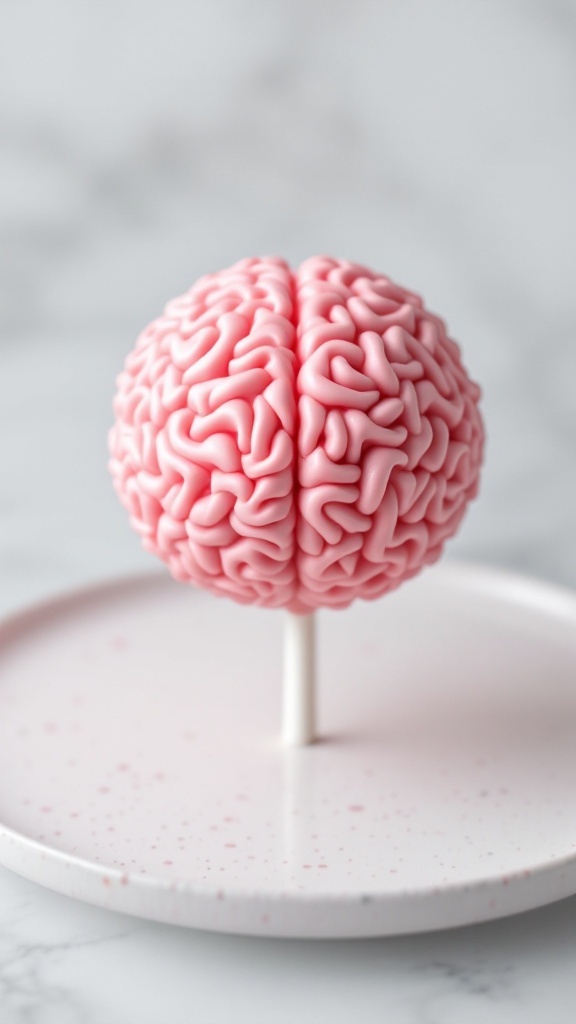
Zombie Brain Cake Pops are a fun and quirky treat perfect for Halloween parties or spooky gatherings. These cake pops feature a delightful pink color and a creative brain-like texture that adds a playful twist to a classic dessert. With a sweet, moist cake center coated in chocolate, they offer a deliciously unique experience that balances fun and flavor.
Making these cake pops is relatively simple, so even novice bakers can dive in and enjoy the process. The result is not only tasty but visually captivating, making them a hit among both kids and adults alike. Let’s get started with the ingredients and instructions!
Ingredients
- 1 box of chocolate cake mix
- 3 eggs
- 1 cup water
- 1/2 cup vegetable oil
- 1 cup pink candy melts
- 1/4 cup white frosting
- 1 tablespoon vegetable shortening (optional)
- Sprinkles for decoration (optional)
Instructions
- Bake the Cake: Preheat your oven according to the instructions on the cake mix box. Prepare a 9×13 inch baking pan and pour in the cake batter. Bake and cool completely.
- Make the Cake Pop Mixture: Crumble the cooled cake in a large bowl. Add the white frosting a little at a time, mixing until the mixture holds together when rolled into a ball.
- Shape the Cake Pops: Form the mixture into small, round balls and place them on a baking sheet lined with parchment paper. Insert lollipop sticks into the center of each ball and freeze for about 30 minutes.
- Melt the Candy Coating: In a microwave-safe bowl, melt the pink candy melts with the optional vegetable shortening in 30-second intervals, stirring until smooth.
- Coat the Cake Pops: Dip each cake pop into the melted candy, ensuring they are fully coated. Allow any excess to drip off. You can use a spoon to help with this.
- Add the Brain Texture: While the coating is still wet, use a piping bag to add squiggly lines to create the brain texture. Let the cake pops set completely.
- Decorate: Once set, feel free to add any additional sprinkles for a spooky touch. Enjoy!
Skull Cake Pops (White With Hollow Eye Sockets)
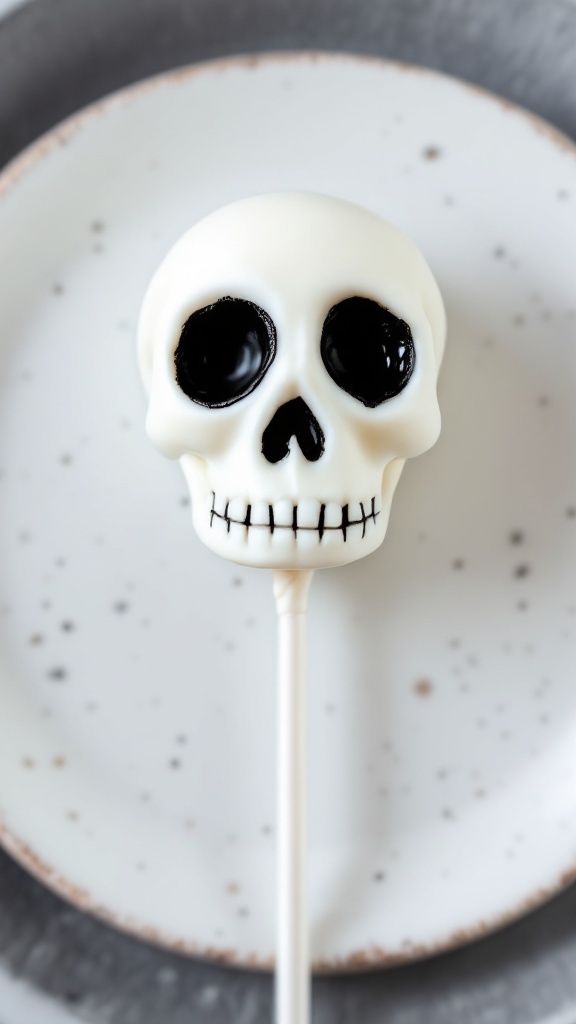
If you’re looking to add a spooky touch to your Halloween festivities, these Skull Cake Pops are a fun and tasty treat! With their creamy white coating and dark eye sockets, they not only look the part but also deliver a delightful flavor that everyone will enjoy. Plus, they are surprisingly easy to make, making them perfect for both novice bakers and seasoned pros alike.
These cake pops are essentially bite-sized cake balls dipped in chocolate and decorated to resemble skulls. The combination of moist cake and sweet chocolate creates a delicious treat that’s sure to be a hit at any Halloween gathering. Gather your friends or family for a fun baking session, and get ready to impress your guests with these spooky delights!
Ingredients
- 1 box of cake mix (any flavor)
- 1 cup frosting (store-bought or homemade)
- 1 cup white chocolate chips
- Black candy melts or food coloring
- 25 lollipop sticks
- Sprinkles (optional)
Instructions
- Bake the Cake: Prepare the cake mix according to package instructions. Once baked, let it cool completely.
- Crumble the Cake: In a large bowl, crumble the cooled cake into fine pieces. Mix in the frosting until well combined.
- Form the Skull Shapes: Using your hands, roll the cake mixture into small oval or skull shapes. Place them on a baking sheet lined with parchment paper.
- Chill the Cake Pops: Insert lollipop sticks into each cake ball and refrigerate for at least 30 minutes to firm them up.
- Melt the Chocolate: In a microwave-safe bowl, melt the white chocolate chips in 30-second intervals, stirring until smooth.
- Dip the Cake Pops: Dip each chilled cake pop into the melted white chocolate, ensuring it’s fully coated. Allow excess chocolate to drip off.
- Decorate: While the chocolate is still wet, use black candy melts or food coloring to create the eye sockets and mouth. Let the chocolate set completely.
- Serve: Once set, display your Skull Cake Pops on a festive platter and enjoy your spooky creations!
Poison Apple Cake Pops (Red With Black
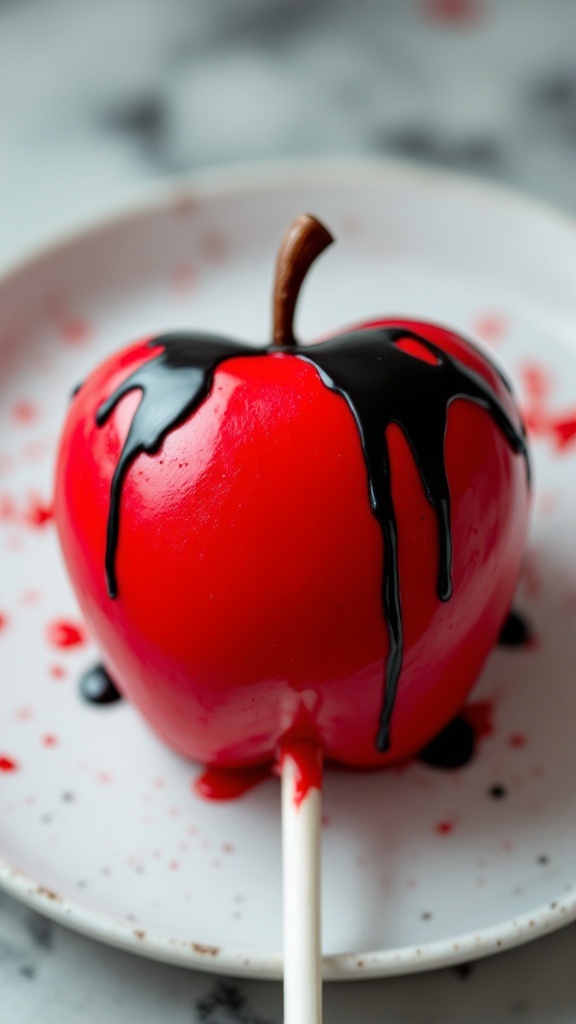
These Poison Apple Cake Pops are a fun and spooky treat, perfect for Halloween parties! With their vibrant red coating and dark chocolate drizzle, they look like something straight out of a fairy tale. The cake inside is moist and flavorful, making each bite a delightful surprise. Plus, they are easy to make, making them a great project for both novice and experienced bakers!
Whether you’re looking to impress guests or simply enjoy a tasty treat, these cake pops will do the trick. They’re not just visually striking; the combination of cake and chocolate creates a satisfying flavor profile that everyone will love. Get ready to have some fun in the kitchen with this simple recipe!
Ingredients
- 1 box cake mix (any flavor)
- 1 cup frosting (store-bought or homemade)
- 12 ounces red candy melts
- 4 ounces dark chocolate (for drizzle)
- Candy apple sticks or lollipop sticks
- Black decorating gel (optional, for extra design)
Instructions
- Bake the Cake: Prepare the cake mix according to the package directions. Once baked, let it cool completely.
- Mix with Frosting: Crumble the cooled cake in a large bowl. Add the frosting and mix until combined. The mixture should be moist but not sticky.
- Form the Pops: Roll the mixture into small balls, about 1 inch in diameter. Insert a stick into each ball and place them on a baking sheet lined with parchment paper. Freeze for about 30 minutes to firm up.
- Melt the Candy: In a microwave-safe bowl, melt the red candy melts according to package instructions until smooth.
- Coat the Pops: Dip each cake pop into the melted candy, ensuring it’s fully covered. Allow excess to drip off before placing it back on the baking sheet.
- Drizzle Chocolate: Once the candy coating has set, melt the dark chocolate and drizzle it over the pops for a spooky touch. Let it harden.
- Add Details: If desired, use black decorating gel to add additional designs.
- Serve: Once everything is set, your Poison Apple Cake Pops are ready to serve! Enjoy your creepy creations!
Coffin Cake Pops (Shaped Like Mini Coffins With Rip Details)
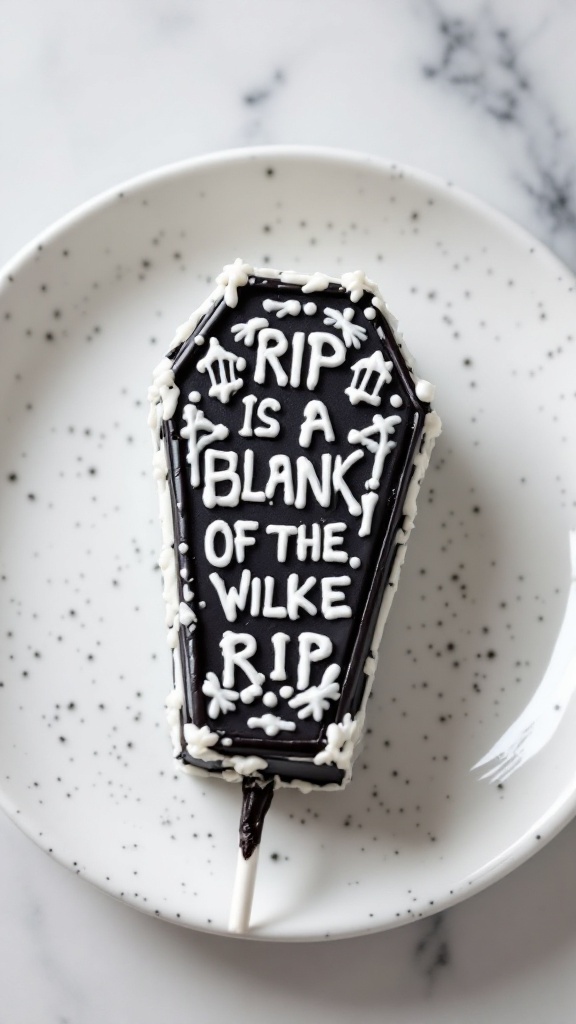
Coffin cake pops are a spooky yet delightful treat perfect for Halloween. These bite-sized desserts are shaped like mini coffins and decorated with fun ‘RIP’ details, making them a hit at any haunted gathering. With a rich flavor and a sweet coating, they offer a playful take on traditional cake pops that everyone will enjoy.
Making coffin cake pops is simple and fun, and kids can even help with the decorating! The process involves baking a cake, crumbling it, and mixing it with frosting before shaping the mixture into coffin molds. Once dipped in chocolate and decorated, these ghoulish goodies are sure to add a festive flair to your Halloween celebrations!
Ingredients
- 1 box chocolate cake mix
- 1 cup frosting (store-bought or homemade)
- 12 oz dark chocolate melting wafers
- White chocolate melting wafers for decoration
- Popsicle sticks
- Black food coloring (optional)
- Sprinkles (optional)
Instructions
- Prepare the Cake: Bake the chocolate cake according to package instructions. Allow it to cool completely.
- Crumble the Cake: Once cooled, crumble the cake into a large bowl. Mix in frosting until the mixture is well combined and holds together.
- Shape the Pops: Using a coffin-shaped mold or your hands, shape the cake mixture into coffin-like forms. Insert a popsicle stick into each coffin and place them on a baking sheet lined with parchment paper.
- Chill: Refrigerate the shaped cake pops for about 30 minutes to help them hold their shape.
- Melt the Chocolate: In a microwave-safe bowl, melt the dark chocolate melting wafers according to package instructions. If desired, mix in a few drops of black food coloring for a deeper hue.
- Dip the Pops: Once the cake pops are chilled, dip each one into the melted chocolate, allowing the excess to drip off. Place them back on the parchment-lined sheet.
- Decorate: While the chocolate is still warm, drizzle white chocolate over the pops and add any sprinkles or decorations you like. Let the chocolate set completely.
- Serve: Once set, these coffin cake pops are ready to be enjoyed! Display them on a spooky platter for a festive touch.