19+ Spooktacular Halloween Snacks You Must Try
Halloween is that time of year when treats take on a spooky twist! Whether you’re hosting a ghoulish gathering or just looking to add some festive flair to your snack table, there are plenty of fun and easy ideas to satisfy your cravings.
From creepy cupcakes to ghostly popcorn, let’s dive into some festive concoctions that will get everyone in the Halloween spirit!
Haunted Halloween Trail Mix
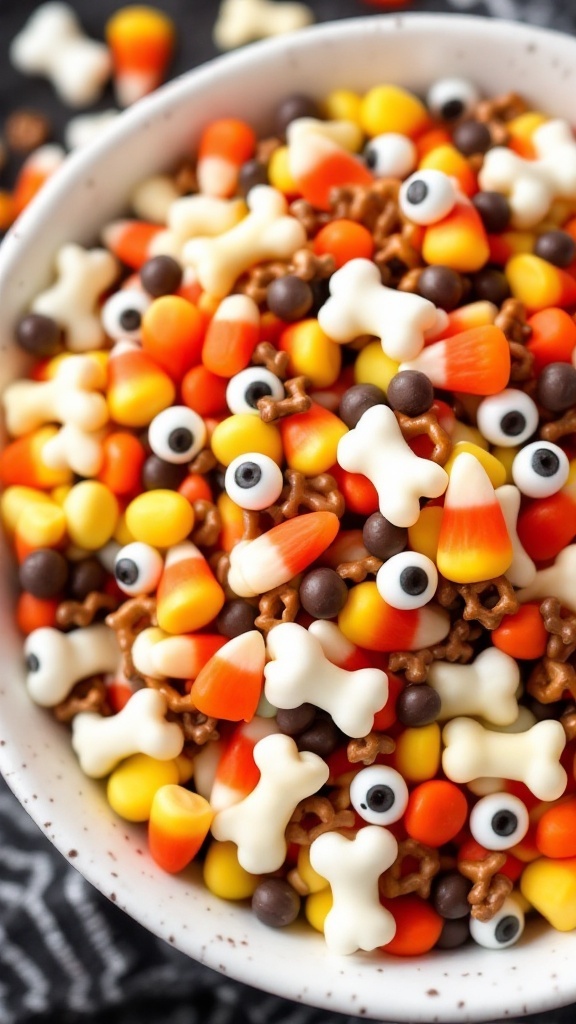
This Haunted Halloween Trail Mix is a fun and festive snack that’s perfect for celebrating the spooky season. Combining sweet and salty flavors, it features a delightful mix of treats that will keep both kids and adults munching happily. Plus, it’s super easy to prepare, making it a great choice for last-minute Halloween gatherings.
With colorful candy corn, crunchy pretzels, and spooky candy eyes, this mix not only looks festive but also offers a satisfying combination of textures and tastes. It’s a creative way to satisfy your sweet tooth while adding a playful touch to your Halloween festivities.
Ingredients
- 2 cups candy corn
- 1 cup chocolate-covered pretzels
- 1 cup peanuts or mixed nuts
- 1 cup yogurt-covered raisins
- 1 cup candy eyes
- 1 cup chocolate chips
Instructions
- Mix Ingredients: In a large bowl, combine the candy corn, chocolate-covered pretzels, nuts, yogurt-covered raisins, candy eyes, and chocolate chips.
- Toss Together: Gently toss the mixture until all the ingredients are evenly distributed.
- Serve: Pour the trail mix into festive bowls or individual bags for easy snacking. Enjoy this spooky treat with friends and family!
Poison Apple Nachos
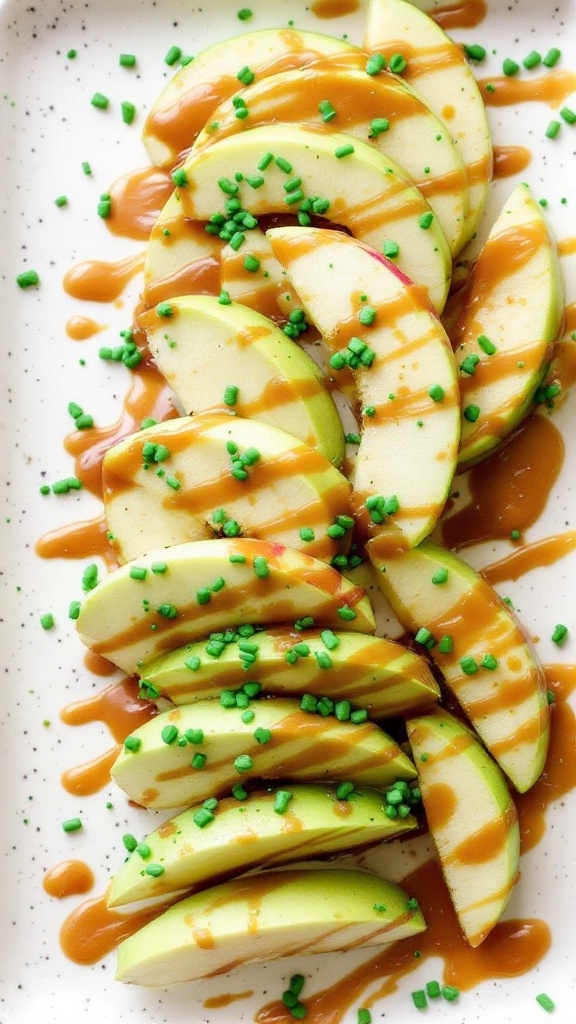
Poison Apple Nachos are a fun and spooky twist on a classic snack that everyone will love. Combining the tartness of green apples with a drizzle of caramel, these nachos create a sweet yet tangy flavor that is simply delightful. Plus, they’re incredibly easy to prepare, making them a perfect treat for Halloween parties or cozy movie nights.
Gather some sliced green apples and top them with gooey caramel sauce and a sprinkle of edible green glitter or crushed nuts for that creepy effect. These nachos are not only tasty but also visually appealing, and they make for a guilt-free snack that satisfies your sweet tooth.
Ingredients
- 3 medium green apples, sliced
- 1/2 cup caramel sauce
- 1/4 cup crushed nuts (optional)
- 1 tablespoon edible green glitter (optional)
Instructions
- Slice the green apples into thin wedges and arrange them on a serving platter.
- Drizzle the caramel sauce generously over the apple slices.
- If using, sprinkle crushed nuts and edible green glitter on top for a spooky touch.
- Serve immediately and enjoy your Halloween-themed snack!
Boo-Nana Ghosts
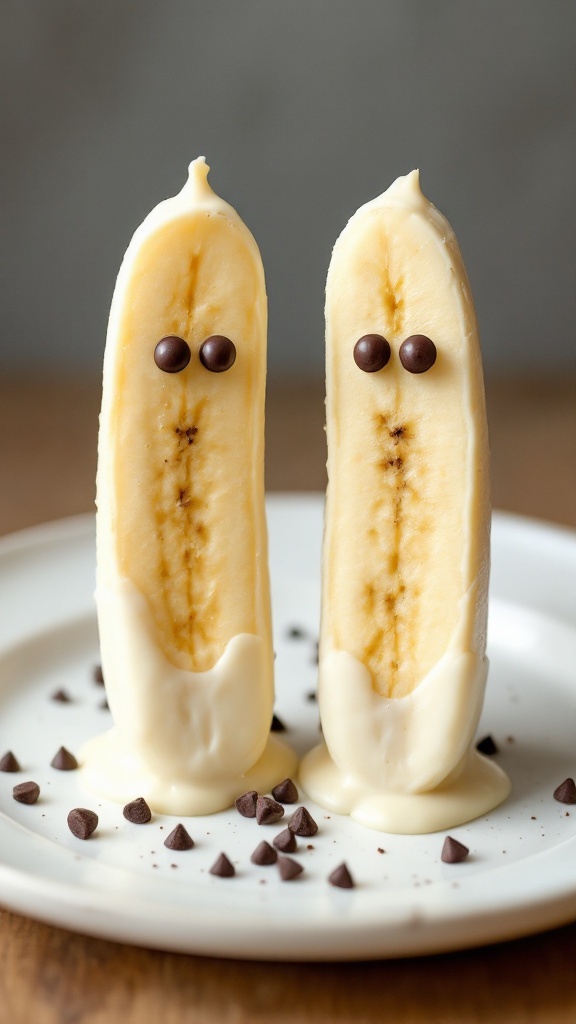
Boo-Nana Ghosts are a delightful Halloween snack that’s both fun and simple to make. These friendly little ghostly treats are essentially bananas dipped in white chocolate, complete with chocolate chip eyes. The combination of sweet banana and creamy chocolate creates a tasty and playful treat that kids and adults alike will enjoy.
Perfect for Halloween parties or just as a festive snack, these Boo-Nana Ghosts are not only easy to whip up but also add a healthy twist to your Halloween festivities. With just a few ingredients and minimal prep time, you can create spooky yet delicious snacks that will impress everyone.
Ingredients
- 2 ripe bananas
- 1 cup white chocolate chips
- Chocolate chips for eyes
Instructions
- Peel the bananas and slice them in half horizontally.
- Melt the white chocolate chips in a microwave-safe bowl, heating in 30-second intervals until smooth.
- Dip each banana half into the melted chocolate, covering it completely, then place it on a baking sheet lined with parchment paper.
- While the chocolate is still wet, add two chocolate chips for eyes on each banana ghost.
- Once all banana halves are dipped and decorated, place the baking sheet in the freezer for about 30 minutes to allow the chocolate to set.
- Serve chilled and enjoy your Boo-Nana Ghosts!
Spider Web Nachos
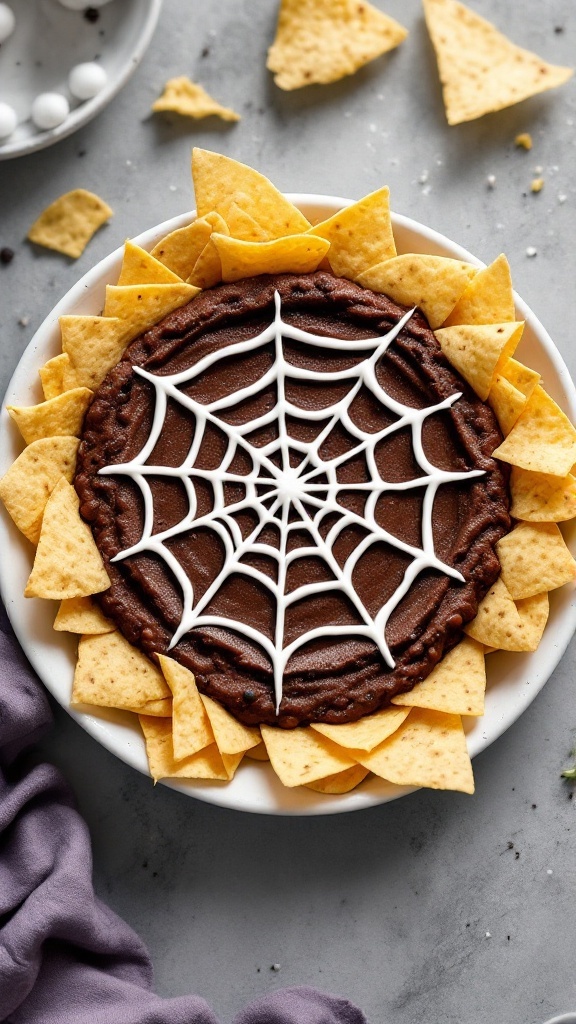
Spider Web Nachos are a fun and creative snack that perfectly fits the spooky vibes of Halloween. Crunchy tortilla chips surround a rich and creamy dip, all topped with an eye-catching spider web design made from icing. This snack is not only visually appealing but also delivers a delightful mix of flavors that everyone will enjoy.
Making these nachos is quite simple, making it a great choice for parties or family gatherings. You can easily customize the dip to your liking, whether you prefer something savory or sweet. Plus, the kids will love helping out with the decorating!
Ingredients
- 3 cups tortilla chips
- 1 cup cream cheese, softened
- 1 cup sour cream
- 1 cup shredded cheddar cheese
- 1/2 cup black olives, sliced
- 1/2 cup green onions, chopped
- 1 cup guacamole (optional)
- 1/2 cup icing (for the web)
Instructions
- Preheat your oven to 350°F (175°C).
- In a medium bowl, mix the softened cream cheese, sour cream, and shredded cheddar cheese until smooth. Add sliced black olives and chopped green onions, mixing well.
- Spread the mixture evenly in a round dish, creating a thick layer for the base.
- Arrange the tortilla chips around the dip in a circular pattern.
- Bake in the preheated oven for about 15 minutes, or until the cheese is melted and bubbly.
- Once removed from the oven, let it cool slightly. Use the icing to create a spider web pattern on top of the dip.
- Serve your Spider Web Nachos warm and enjoy this festive treat!
Severed Witch Finger Breadsticks
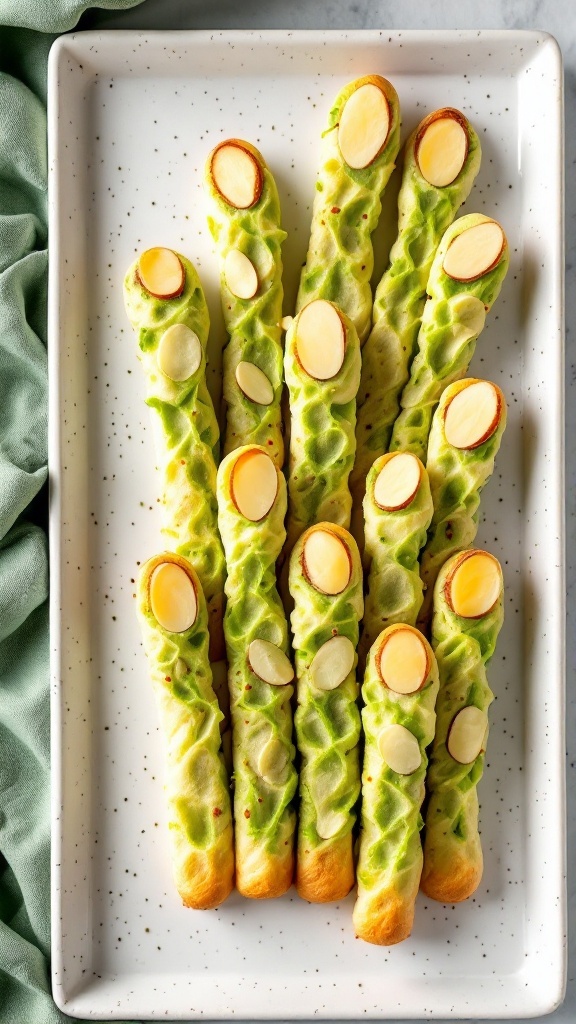
These Severed Witch Finger Breadsticks are a delightfully spooky treat perfect for Halloween gatherings. They boast a savory flavor, with a crispy exterior and a soft interior, making them a fun addition to any party. Plus, they are easy to whip up, allowing you to impress your guests without spending all day in the kitchen.
With their green hue and almond “fingernails,” these breadsticks are not only tasty but also visually striking. Serve them alongside your favorite dips or soups for a festive touch that adds a spooky vibe to your Halloween spread!
Ingredients
- 1 package refrigerated pizza dough
- 1/4 cup pesto sauce
- 1/4 cup grated Parmesan cheese
- Almond slices (for nails)
- 1 egg (beaten, for egg wash)
Instructions
- Preheat the Oven: Preheat your oven to 400°F (200°C).
- Prepare the Dough: Roll out the pizza dough on a floured surface. Cut the dough into finger-sized strips.
- Add the Pesto: Spread a thin layer of pesto sauce over each strip and sprinkle with Parmesan cheese.
- Shape the Fingers: Twist each strip to create a finger-like shape and place on a baking sheet lined with parchment paper.
- Decorate: Press an almond slice at the tip of each breadstick to resemble a fingernail.
- Brush with Egg: Brush each breadstick with the beaten egg for a golden finish.
- Bake: Bake for 15-20 minutes, or until golden brown and crispy. Let cool slightly before serving.
Rotten Teeth Apples
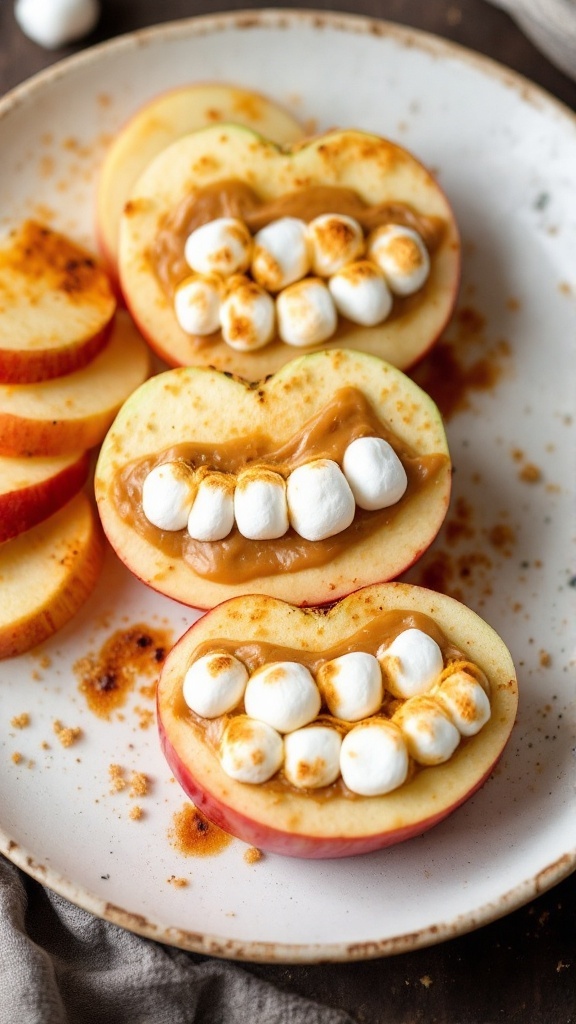
Rotten Teeth Apples are a fun and spooky treat perfect for Halloween! These delicious snacks combine the crispness of apples with the sweetness of marshmallows and a touch of creativity. They taste sweet and slightly tart, making them a delightful addition to any Halloween gathering.
Making these Rotten Teeth Apples is simple and quick, making them an ideal choice for kids and adults alike. Just slice some apples, add marshmallows for the “teeth,” and you’re ready to go! It’s a great way to enjoy a healthy snack with a spooky twist.
Ingredients
- 2 apples (any variety)
- 1 cup mini marshmallows
- 1/4 cup peanut butter or almond butter
- 1 tablespoon honey (optional)
- 1 tablespoon powdered sugar (for dusting)
Instructions
- Prepare the Apples: Slice the apples into thick rounds and remove the core. You can leave the skin on for added color and texture.
- Make the Filling: Spread a thin layer of peanut butter or almond butter on one side of each apple slice.
- Assemble the Teeth: Place mini marshmallows on the peanut butter side, positioning them to resemble teeth. You can use smaller pieces of marshmallow for more detail.
- Dust with Powdered Sugar: Lightly dust the assembled apples with powdered sugar for a spooky, ghostly effect.
- Serve: Arrange the Rotten Teeth Apples on a platter and enjoy your spooky snack!
Haunted Cookie House
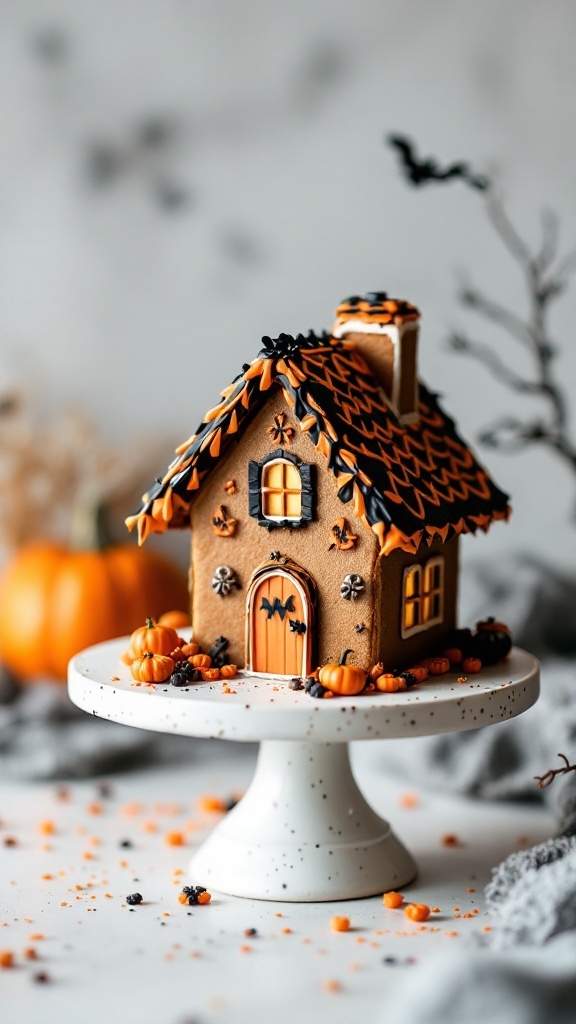
Creating a Haunted Cookie House is a delightful way to celebrate Halloween with some fun baking. This spooky treat combines the rich flavors of gingerbread with colorful icing and decorations, making it both tasty and visually appealing. The aroma of spices fills your kitchen as the cookies bake, setting the perfect mood for the season.
While it may look intricate, assembling a Haunted Cookie House can be a simple project, especially when you involve family or friends. Kids will love decorating it, adding their unique touches. You’ll end up with a charming centerpiece that’s also a delicious snack!
Ingredients
- 3 cups all-purpose flour
- 1 teaspoon baking powder
- 1 tablespoon ground ginger
- 1 tablespoon ground cinnamon
- 1/2 teaspoon ground cloves
- 1/2 teaspoon salt
- 1 cup unsalted butter, softened
- 1 cup brown sugar, packed
- 1 large egg
- 1/4 cup molasses
- 2 cups powdered sugar
- 1 tablespoon milk
- Food coloring (orange, black, etc.)
- Assorted candies for decoration
Instructions
- Make the Dough: In a bowl, whisk together flour, baking powder, ginger, cinnamon, cloves, and salt. In another bowl, beat the butter and brown sugar until fluffy. Add the egg and molasses, mixing well. Gradually add the dry ingredients until combined.
- Shape and Chill: Divide the dough into two equal pieces, flatten them into disks, wrap in plastic wrap, and refrigerate for at least 2 hours.
- Roll and Cut: Preheat your oven to 350°F (175°C). Roll out the dough on a floured surface to about 1/4-inch thick. Use cookie cutters or templates to cut out the shapes for your house. Place them on baking sheets lined with parchment paper.
- Bake: Bake for 10-12 minutes, or until the edges are firm. Let cool completely on wire racks.
- Decorate: Mix powdered sugar and milk to create a thick icing. Divide into bowls and add food coloring. Use the icing to assemble and decorate your cookie house with candies. Get creative with your spooky designs!
Candy Corn Fudge
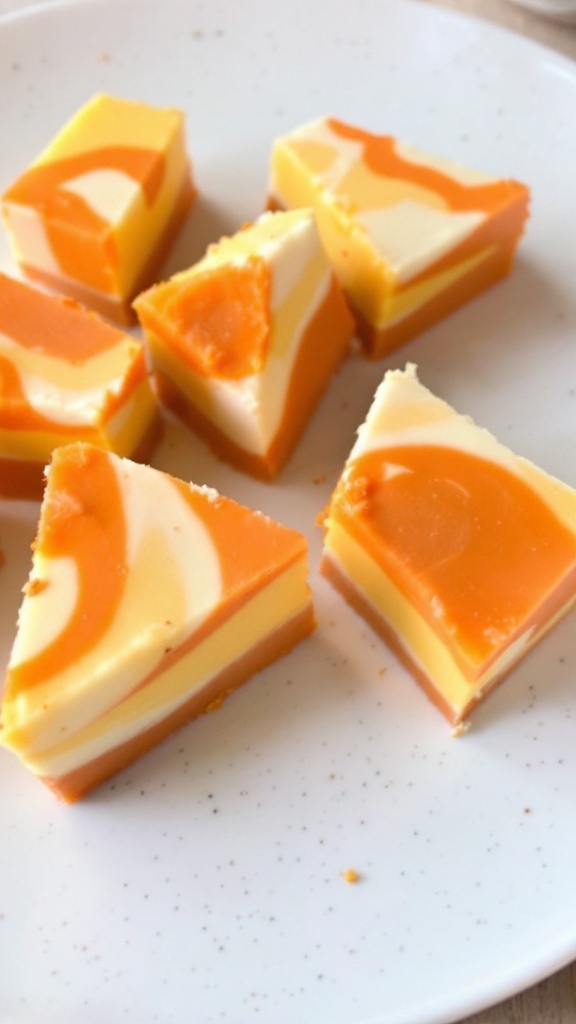
This Candy Corn Fudge is a delightful treat that captures the essence of Halloween in every bite. With its sweet layers of white and orange chocolate, this fudge not only looks festive but also offers a creamy texture that melts in your mouth.
Easy to make and perfect for sharing, this recipe is a fun way to celebrate the spooky season. Kids and adults alike will love the sweet flavors reminiscent of the classic Halloween candy.
Ingredients
- 2 cups white chocolate chips
- 1 can (14 oz) sweetened condensed milk
- 1 teaspoon vanilla extract
- 1 cup orange candy melts
- 1/4 cup yellow candy melts
- 1/2 teaspoon salt
Instructions
- Prepare the Pan: Line an 8-inch square baking dish with parchment paper, leaving some overhang for easy removal.
- Make the Base: In a saucepan, combine white chocolate chips, sweetened condensed milk, and salt. Cook over low heat, stirring until smooth and melted. Pour half of this mixture into the prepared pan.
- Add Color: To the remaining fudge mixture, melt the orange and yellow candy melts together, then stir them into the mixture. Pour this layer over the white fudge in the pan.
- Swirl: Use a toothpick or knife to gently swirl the two layers together for a marbled effect.
- Chill: Refrigerate for 2-3 hours until firm. Once set, lift the fudge out using the parchment paper and cut it into squares.
Mummy-Wrapped Dates

Mummy-Wrapped Dates are a spooky and fun Halloween snack that’s both sweet and savory. These little bites are made using dates wrapped in crescent dough, giving them a delightful mix of chewy and flaky textures. They’re easy to make and sure to impress your guests with their playful mummy appearance!
The sweet dates provide a burst of flavor that pairs perfectly with the buttery crescent dough. Plus, you can get creative with decorating them to add a little Halloween flair. Whether you’re hosting a Halloween party or just looking for a festive treat, these Mummy-Wrapped Dates are a delightful choice!
Ingredients
- 1 can of crescent roll dough
- 12 large Medjool dates, pitted
- 1/4 cup cream cheese, softened
- 1/4 cup chopped nuts (optional)
- Edible candy eyes for decoration
Instructions
- Preheat your oven to 375°F (190°C).
- In a bowl, mix the softened cream cheese with the chopped nuts, if using. Stuff each pitted date with a spoonful of the cream cheese mixture.
- Unroll the crescent dough and cut it into thin strips.
- Wrap the strips around each stuffed date to create a mummy look, leaving a small opening for the “eyes.”
- Place the wrapped dates on a baking sheet lined with parchment paper and bake for 12-15 minutes or until golden brown.
- Once baked, let them cool slightly and then add candy eyes to each mummy before serving.
Screaming Strawberry Ghosts

Screaming Strawberry Ghosts are a fun and spooky treat that’s perfect for Halloween. With their creamy white chocolate coating and dark chocolate expressions, these little ghostly strawberries are both adorable and delicious. They bring a delightful mix of sweet and fruity flavors, making them a hit for kids and adults alike.
This recipe is straightforward and requires minimal ingredients, so even if you’re not an expert in the kitchen, you can whip these up in no time. They’re a playful addition to any Halloween party or movie night!
Ingredients
- 1 pound fresh strawberries
- 8 ounces white chocolate or candy melts
- 1/4 cup dark chocolate chips
- Cooking spray or parchment paper for lining
Instructions
- Prepare the Strawberries: Gently wash and dry the strawberries, leaving the green tops on. They should be completely dry for the chocolate to stick.
- Melt the White Chocolate: In a microwave-safe bowl, melt the white chocolate in 30-second intervals, stirring after each until smooth. Be careful not to overheat.
- Dip the Strawberries: Hold each strawberry by the green top and dip it into the melted white chocolate, ensuring it’s well-coated. Let excess chocolate drip off, then place the dipped strawberries on a baking sheet lined with parchment paper.
- Make the Faces: While the white chocolate is still soft, place two dark chocolate chips on each strawberry to create eyes and one for a mouth. Let the chocolate cool and harden.
- Serve: Once the chocolate is set, arrange the Screaming Strawberry Ghosts on a serving platter and enjoy your spooky treats!
Radioactive Jell-O Cups
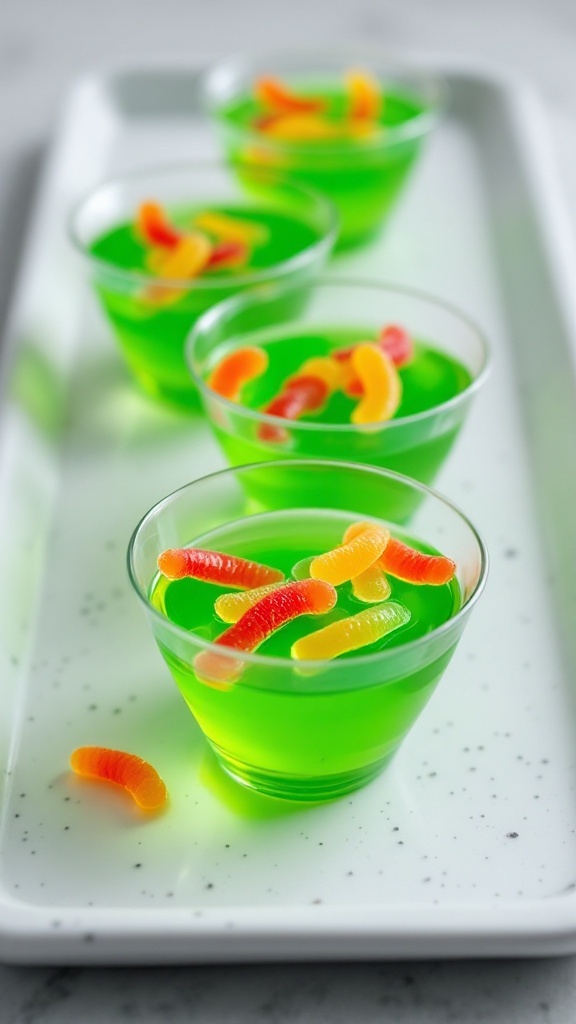
Radioactive Jell-O Cups are a fun and spooky treat that will thrill kids and adults alike at any Halloween gathering. Bright green in color, these cups have a playful vibe that perfectly captures the spirit of the season. They are sweet and tangy, with a delightful texture that makes them easy to enjoy. Plus, they’re super simple to whip up, requiring just a few ingredients and minimal prep time.
The combination of the vibrant Jell-O and gummy worms adds a whimsical touch that makes these cups a standout snack. They are not only visually striking but also offer a tasty burst of flavor that everyone will love. Perfect for parties or as a fun dessert, these Radioactive Jell-O Cups are sure to be a hit.
Ingredients
- 3 cups boiling water
- 1 package (3 oz) green lime Jell-O
- 1 package (3 oz) gelatin
- 1 cup cold water
- Gummy worms for garnish
Instructions
- Combine boiling water with the lime Jell-O and gelatin in a mixing bowl. Stir until completely dissolved.
- Add cold water and mix well. Pour the mixture into small plastic or glass cups.
- Refrigerate the cups for at least 2-4 hours until set.
- Once set, garnish each cup with gummy worms on top before serving. Enjoy your spooky treat!
Bone Yard White Chocolate Pretzels
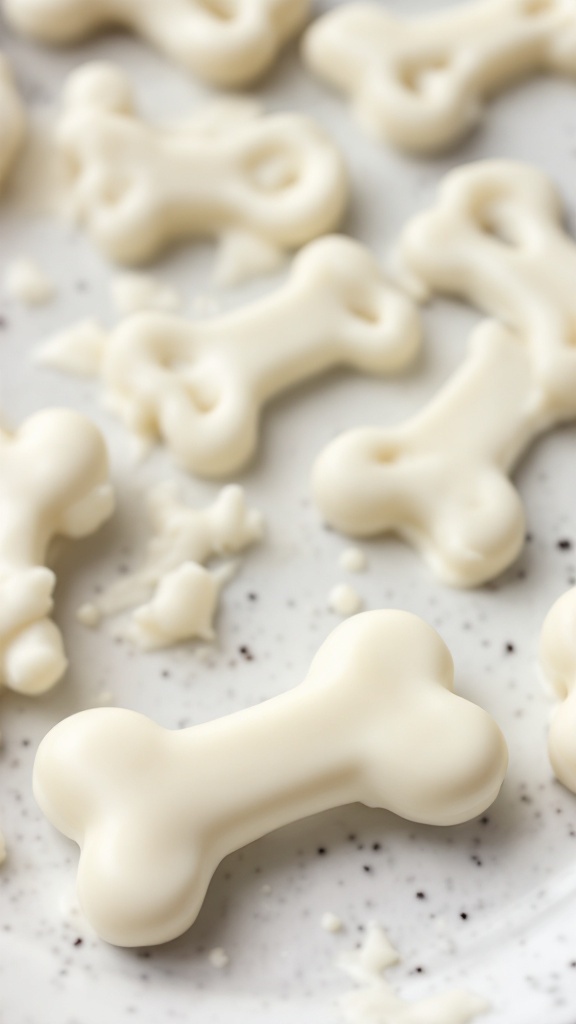
Bone Yard White Chocolate Pretzels are a fun and tasty treat that fit right into the Halloween spirit. With their sweet white chocolate coating and crunchy pretzel base, they’re the perfect mix of salty and sweet. Plus, they are simple to whip up, making them a great choice for last-minute gatherings or spooky celebrations.
This recipe balances the slight bitterness of the white chocolate with the saltiness of the pretzels, creating a delightful combination. Decorate them in spooky ways to enhance the Halloween theme, and you’ll have a snack that everyone will enjoy!
Ingredients
- 2 cups pretzel rods
- 1 cup white chocolate chips
- Sprinkles (optional, for decoration)
- Black food coloring (optional, for decoration)
Instructions
- Prepare the Pretzels: Lay out the pretzel rods on a baking sheet lined with parchment paper.
- Melt the Chocolate: In a microwave-safe bowl, melt the white chocolate chips in 30-second intervals, stirring between each until smooth.
- Coat the Pretzels: Dip each pretzel rod into the melted white chocolate, ensuring it’s fully coated. Allow any excess chocolate to drip off.
- Add Decorations: Before the chocolate sets, sprinkle with festive toppings or drizzle with black food coloring for an eerie touch.
- Let Set: Place the coated pretzels in the fridge for about 30 minutes or until the chocolate hardens. Once set, enjoy your Bone Yard White Chocolate Pretzels!
Edible Monster Slime
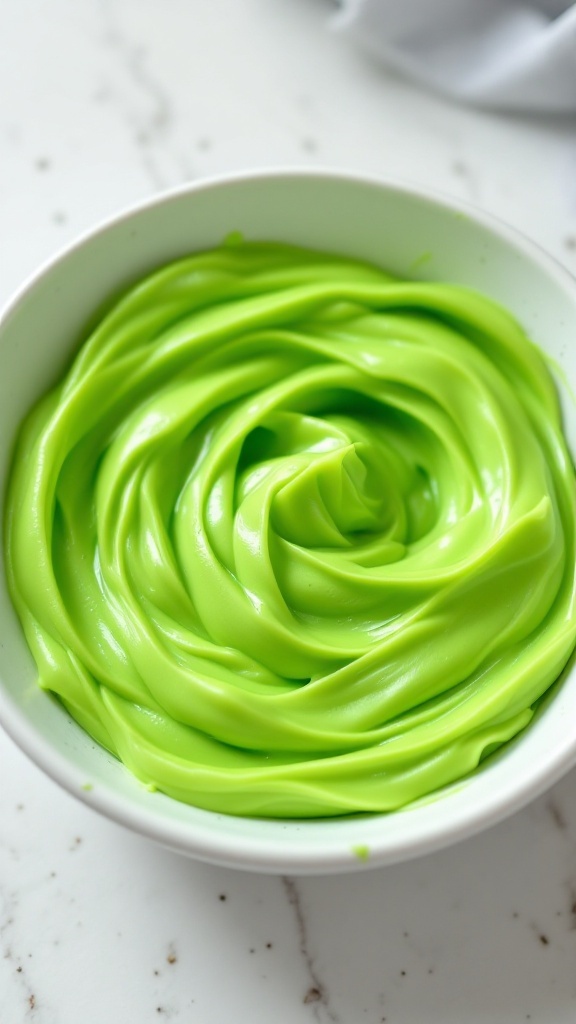
Looking for a fun and spooky treat this Halloween? Edible Monster Slime is not only a playful snack but also a delicious one! With its smooth and gooey texture, this slime can be a hit at any Halloween gathering, and it’s simple enough for kids to help make.
The flavor is refreshing and sweet, perfect for those who love unique snacks. Plus, the vibrant green color adds a festive touch to your Halloween spread. Get ready to impress your guests and have a blast while making this tasty treat!
Ingredients
- 1 cup cornstarch
- 1/2 cup sweetened condensed milk
- 1/4 cup water
- 1 teaspoon vanilla extract
- Green food coloring (to desired color)
Instructions
- In a mixing bowl, combine cornstarch and sweetened condensed milk.
- Add water and vanilla extract, mixing until smooth.
- Incorporate green food coloring until you achieve your desired slime color.
- Knead the mixture with your hands until it reaches a slime-like consistency.
- Serve in a bowl and enjoy your spooky snack!
Creepy Crawler Crackers

Creepy Crawler Crackers are a fun and spooky snack perfect for Halloween gatherings. These delightful treats combine the crunch of crackers with a fluffy cream cheese topping, all topped off with creepy crawly decorations. They are simple to make and add a playful touch to any Halloween spread, making them a hit with both kids and adults.
The combination of savory crackers and sweet, creamy filling creates a tasty contrast that keeps everyone coming back for more. Plus, you can customize them with your favorite toppings! Get ready to impress your guests with these easy and exciting snacks.
Ingredients
- 1 package of round crackers
- 8 oz cream cheese, softened
- 1/4 cup sour cream
- 1 teaspoon garlic powder
- Salt and pepper to taste
- Black decorating gel or edible spiders for topping
Instructions
- In a mixing bowl, combine softened cream cheese, sour cream, garlic powder, salt, and pepper. Mix until smooth and creamy.
- Spread a generous amount of the cream cheese mixture onto each cracker.
- Use black decorating gel to create spider webs or place edible spider candies on top of the filled crackers.
- Arrange the crackers on a platter and serve immediately, or refrigerate until ready to serve.
Pumpkin Patch Popcorn
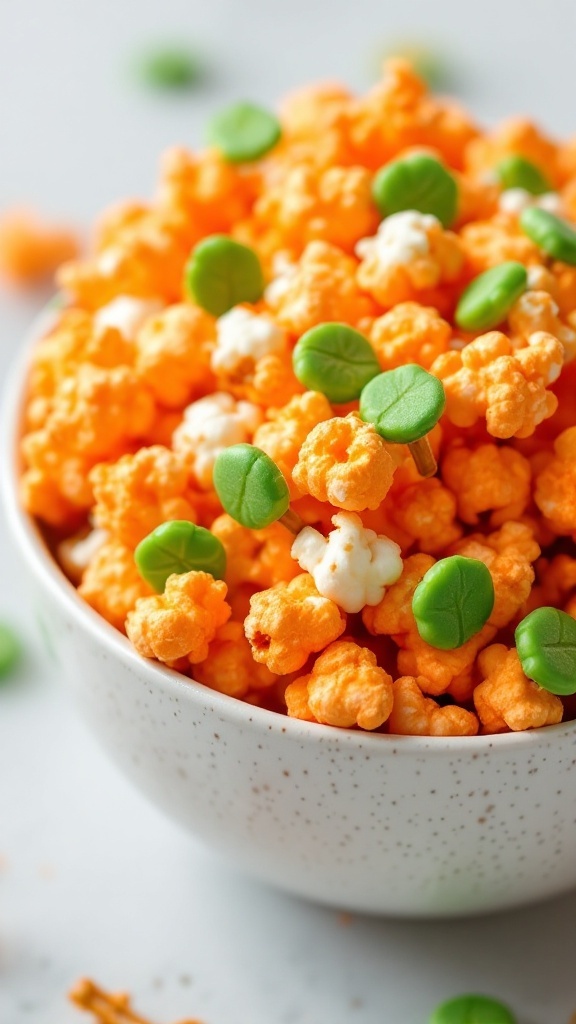
Get ready for a fun and festive treat that embodies the spirit of Halloween! Pumpkin Patch Popcorn is not only colorful and eye-catching, but it also offers a delightful mix of sweet and salty flavors. This snack is perfect for movie nights, parties, or just a cozy evening at home.
Making this popcorn is simple and enjoyable, allowing everyone to join in on the fun. With vibrant orange popcorn and cute green candy leaves, it’s sure to bring smiles and a bit of Halloween magic to your gatherings.
Ingredients
- 8 cups popped popcorn
- 1 cup orange candy melts
- 1 cup white candy melts
- 1 cup green candy leaves (or candy corn)
- 1/2 teaspoon sea salt (optional)
Instructions
- Prepare the Popcorn: Start by popping your popcorn in an air popper or on the stove. Place the popped popcorn in a large bowl and set aside.
- Melt the Candy: In separate microwave-safe bowls, melt the orange and white candy melts according to package instructions, stirring until smooth.
- Coat the Popcorn: Drizzle the melted orange candy over the popcorn, gently tossing to coat evenly. Do the same with the white candy melts, mixing to create a swirled effect.
- Add the Leaves: Sprinkle the green candy leaves over the popcorn while the candy coating is still wet, allowing them to stick.
- Set and Serve: Let the popcorn sit for a few minutes until the candy hardens. Once set, break it into pieces and serve in a large bowl or individual snack bags.
Cursed Chocolate Bark
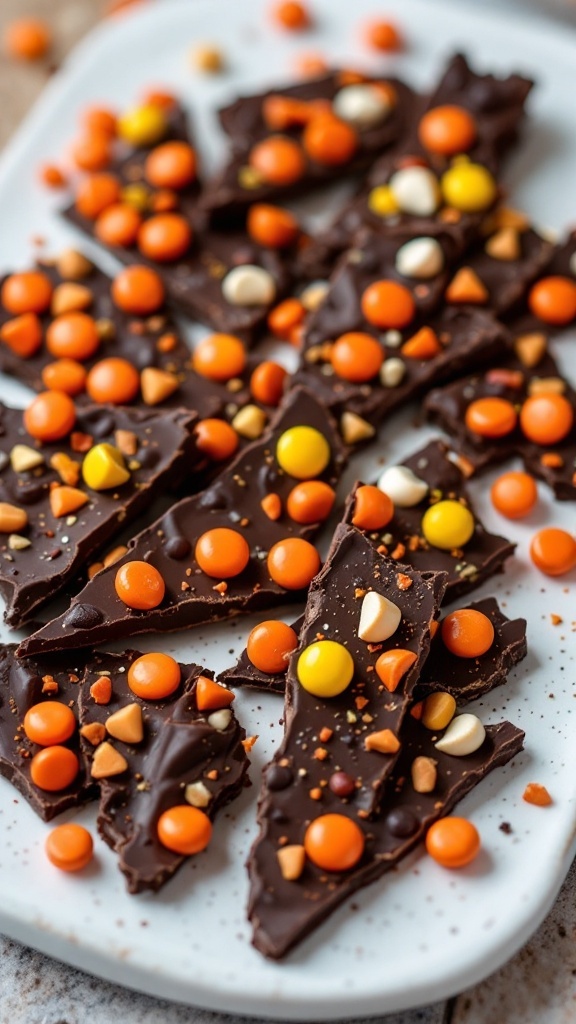
Cursed Chocolate Bark is a delightful treat that’s perfect for Halloween gatherings. With a rich, dark chocolate base topped with colorful candy pieces, this snack is both visually appealing and delicious. The sweet and salty flavors blend perfectly, making it a favorite among both kids and adults.
This recipe is super easy to make, requiring just a few ingredients and minimal effort. You can whip it up in no time, leaving you with more hours to enjoy the spooky season!
Ingredients
- 2 cups dark chocolate chips
- 1 cup candy corn
- 1/2 cup peanut butter chips
- 1/2 cup white chocolate chips
- 1/4 cup crushed pretzels
Instructions
- Melt the chocolate: In a microwave-safe bowl, melt the dark chocolate chips in 30-second intervals, stirring until smooth.
- Prepare the baking sheet: Line a baking sheet with parchment paper.
- Spread the chocolate: Pour the melted chocolate onto the prepared baking sheet and spread it into an even layer.
- Add toppings: Sprinkle candy corn, peanut butter chips, white chocolate chips, and crushed pretzels evenly over the chocolate.
- Chill: Place the baking sheet in the refrigerator for about 30 minutes or until the chocolate is set.
- Break and serve: Once hardened, break the bark into irregular pieces and serve at your Halloween party!
Graveyard Pudding Cups
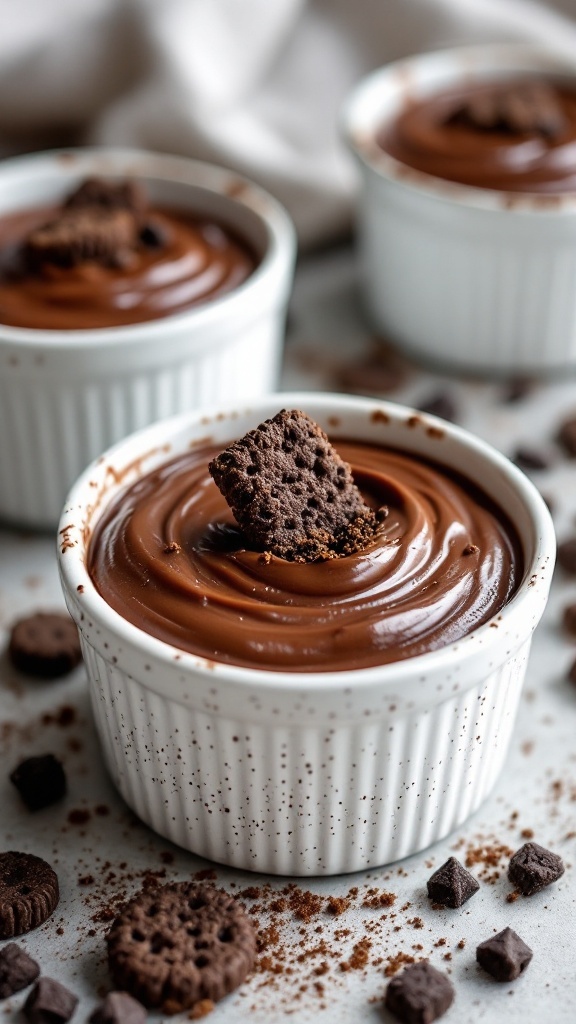
Graveyard pudding cups are a fun and spooky treat for any Halloween celebration. These deliciously rich chocolate pudding cups are layered with crushed cookies to resemble dirt, making them perfect for a themed party. Not only do they taste delightful with their creamy texture, but they also provide a playful presentation that kids and adults alike will enjoy.
Making these pudding cups is simple and doesn’t require any baking. Just whip up a quick chocolate pudding, layer it with cookie crumbs, and decorate with cute gummy worms or other Halloween-themed candies. It’s an easy and creative way to add some festive flair to your Halloween snacks!
Ingredients
- 2 cups of milk
- 1 cup of chocolate pudding mix
- 1 cup crushed chocolate sandwich cookies
- Gummy worms or other candy for decoration
Instructions
- In a mixing bowl, combine the milk and chocolate pudding mix. Whisk until smooth and let it sit for about 5 minutes to thicken.
- In clear cups or small bowls, spoon a layer of chocolate pudding into the bottom.
- Sprinkle a generous layer of crushed chocolate cookies over the pudding to create a “dirt” layer.
- Add another layer of pudding on top, followed by more crushed cookies.
- Finish off with some gummy worms or other Halloween candies placed on top.
- Chill in the refrigerator for at least 30 minutes before serving for the best texture.
Shrunken Head Apple Carvings
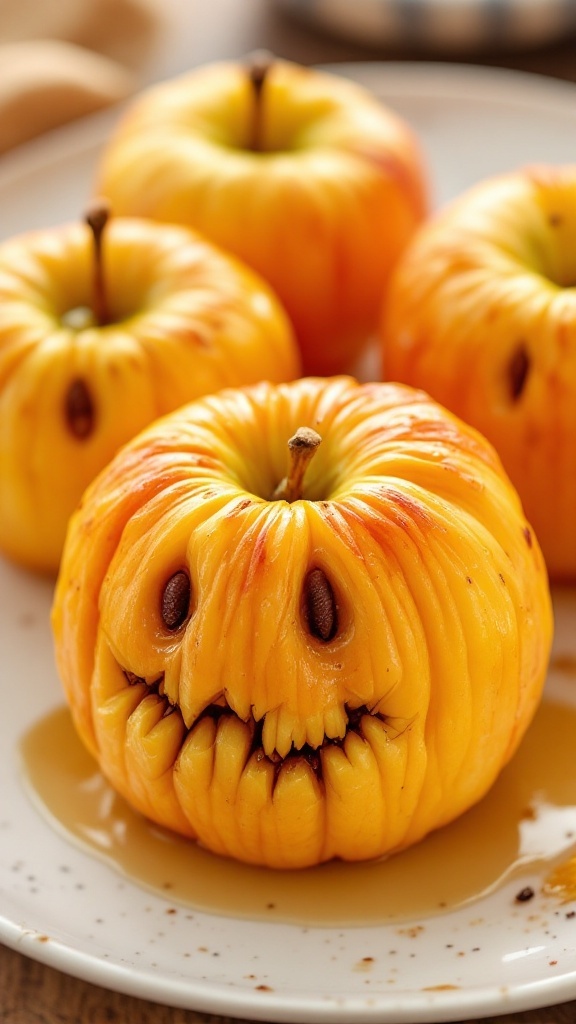
These shrunken head apple carvings are a fun and spooky treat that’s perfect for Halloween. The sweet and slightly tart flavor of baked apples makes for a delightful snack, while their creepy appearance adds a playful touch to your festive celebrations. Plus, they are surprisingly simple to make, requiring just a few ingredients and minimal effort.
All you need are fresh apples, a few basic tools, and a touch of creativity to bring these ghoulish snacks to life. They can be enjoyed on their own or served alongside caramel or peanut butter for dipping. Get ready to impress your friends and family with this unique recipe!
Ingredients
- 4 medium apples
- 1 lemon (juiced)
- 2 tablespoons brown sugar
- 1 teaspoon ground cinnamon
- 1/4 teaspoon nutmeg
- 1/4 cup water
Instructions
- Preheat the oven to 200°F (93°C).
- Core the apples and, using a paring knife, carefully carve facial features into each apple to create spooky expressions.
- In a bowl, mix lemon juice, brown sugar, cinnamon, and nutmeg. Rub this mixture all over the carved apples.
- Place the apples in a baking dish and add water to the bottom of the dish to keep them moist.
- Bake for about 2-3 hours, checking occasionally, until the apples have shrunk and the faces are well-defined. Let them cool before serving.
Werewolf Chow

Werewolf Chow is a delightful Halloween snack that combines crunchy chocolate cereal with sweet ingredients like coconut flakes and peanut butter. This treat is not only fun to make but also packed with flavor, making it a hit among both kids and adults. It’s a quick and simple recipe that can be whipped up in no time, perfect for those spooky gatherings!
The crunchy texture of the cereal combined with the creamy peanut butter and the sweet coconut creates a satisfyingly chewy snack that resembles the wildness of a werewolf’s feast. It’s great for parties or a cozy movie night. Plus, you can easily customize it by adding your favorite candies or nuts!
Ingredients
- 4 cups chocolate cereal
- 1 cup creamy peanut butter
- 1/2 cup honey
- 1 cup shredded coconut
- 1/2 cup chocolate chips
Instructions
- Combine peanut butter and honey in a saucepan over low heat, stirring until melted and smooth.
- In a large bowl, mix chocolate cereal with the peanut butter mixture until well coated.
- Add shredded coconut and chocolate chips, stirring until evenly distributed.
- Spread the mixture onto a baking sheet lined with parchment paper, allowing it to cool for about 30 minutes.
- Once set, break into pieces and serve as a fun Halloween snack!
Crystal Ball Cake Pops

Crystal Ball Cake Pops are a fun and whimsical treat that perfectly captures the spirit of Halloween. These bite-sized desserts combine a moist cake interior with a sweet candy coating, making them a delightful snack that kids and adults alike will enjoy. The smooth outside gives way to a colorful surprise inside, reminiscent of a magical crystal ball!
Making these cake pops is quite simple and requires minimal baking skills. They are great for parties, as you can customize the colors and decorations to match your Halloween theme. Whether you’re hosting a spooky gathering or just want a festive treat, these cake pops are sure to bring smiles.
Ingredients
- 1 box cake mix (any flavor)
- Ingredients required for the cake (usually eggs, oil, and water)
- 1 cup frosting (store-bought or homemade)
- 1 lb white chocolate or candy melts
- Sprinkles or edible glitter for decoration
- Pop sticks or lollipop sticks
Instructions
- Bake the Cake: Prepare the cake according to the package directions. Once baked, let it cool completely.
- Crumble the Cake: In a large bowl, crumble the cooled cake into fine pieces. Add the frosting gradually and mix until combined, creating a dough-like consistency.
- Form the Balls: Roll the mixture into small balls, about 1 inch in diameter, and place them on a baking sheet. Chill in the refrigerator for about 30 minutes.
- Melt the Chocolate: While the cake balls are chilling, melt the white chocolate or candy melts in a microwave-safe bowl according to package instructions.
- Insert Sticks: Dip the tip of each pop stick into the melted chocolate, then insert it into a cake ball to help secure it. Dip each ball into the melted chocolate, ensuring it is fully coated. Allow excess chocolate to drip off.
- Add Decorations: Before the chocolate sets, sprinkle with your choice of sprinkles or edible glitter for a festive touch.
- Let Set: Place the finished cake pops upright in a foam block or a stand to let the chocolate harden completely.